Mavic 4 Pro Wildlife Survey Guide: Field Tactics
Mavic 4 Pro Wildlife Survey Guide: Field Tactics
META: Master wildlife surveying in remote terrain with the Mavic 4 Pro. Expert field tactics for obstacle avoidance, subject tracking, and D-Log capture.
By Chris Park | Creator
TL;DR
- The Mavic 4 Pro's omnidirectional obstacle avoidance system outperforms every sub-2kg drone for navigating dense canopy, ravines, and unpredictable terrain during wildlife surveys.
- ActiveTrack 6.0 locks onto moving animals with a precision that eliminates the biggest pain point in remote wildlife documentation: losing your subject.
- D-Log color profile and 20MP Hasselblad sensor capture scientifically usable footage even in harsh, mixed-lighting field conditions.
- Up to 46 minutes of flight time means fewer battery swaps, fewer disturbances to sensitive habitats, and more data per mission.
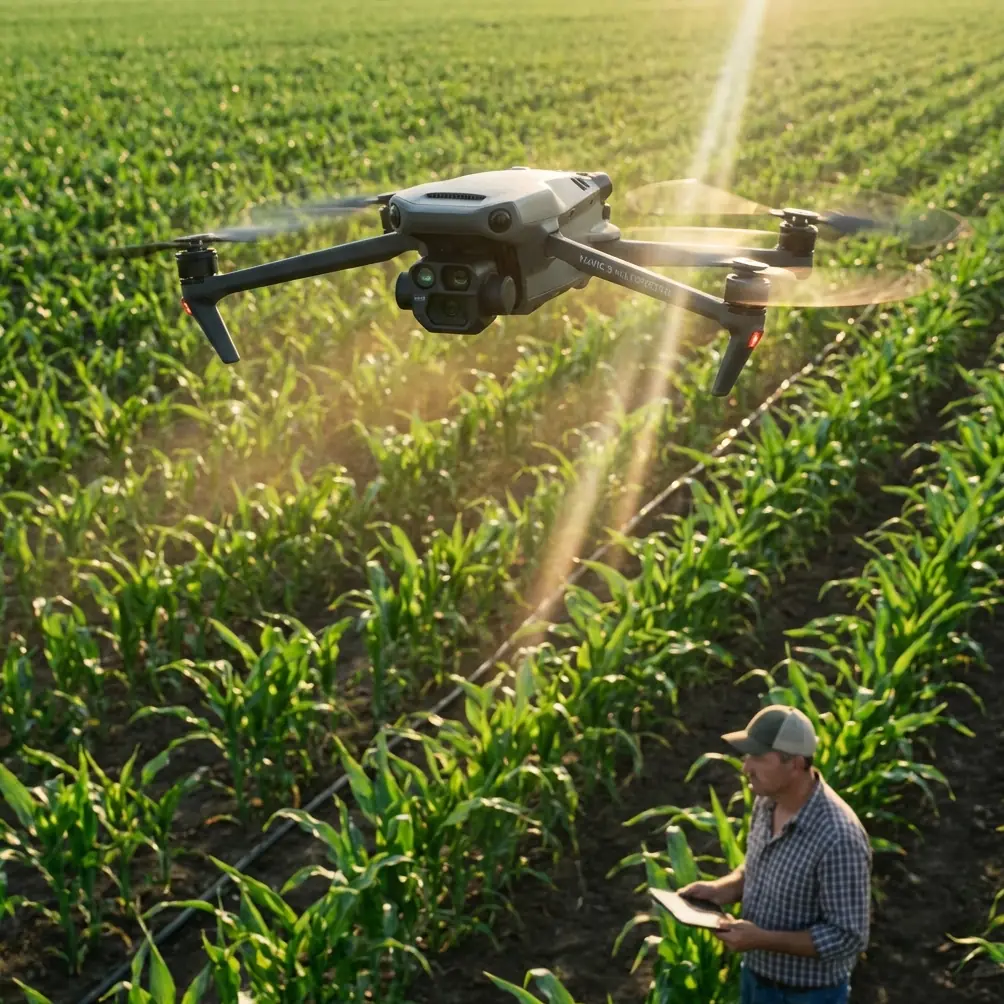
The Core Problem: Wildlife Surveys in Remote Terrain Are Brutal on Equipment and Operators
Tracking animals across unmarked wilderness breaks gear and burns time. Traditional wildlife surveying methods—ground blinds, manned aircraft, even older drone platforms—share three critical failures: they disturb the subjects, they can't navigate complex terrain autonomously, and they produce footage that lacks the dynamic range needed for species identification and behavioral analysis.
If you've tried running a wildlife survey with a consumer drone in dense forest, across open savanna with erratic thermals, or along cliff-nesting colonies, you already know the frustration. Lost signal. Clipped propellers. Washed-out footage at golden hour when animals are most active.
The Mavic 4 Pro was built to solve every one of these problems. This guide breaks down exactly how to deploy it for remote wildlife surveying, which settings matter, and where it decisively beats the competition.
Why the Mavic 4 Pro Dominates Remote Wildlife Fieldwork
Omnidirectional Obstacle Avoidance That Actually Works in the Wild
Most drones claim obstacle avoidance. In practice, legacy systems using basic infrared or single-vision sensors fail in exactly the conditions wildlife surveyors face: low light, irregular organic shapes, and fast lateral movement through trees.
The Mavic 4 Pro uses a 360° binocular vision system with millimeter-wave radar, detecting obstacles in all directions with a sensing range of up to 50 meters. This isn't a lab spec—this is the margin between a successful survey transect through old-growth forest and a drone wrapped around a branch.
Key advantages over competitors:
- Autel EVO II Pro V3 uses only 12 vision sensors with no supplemental radar, resulting in significantly higher collision rates in complex organic environments.
- Skydio S2+ excels at autonomous obstacle avoidance but sacrifices camera quality, sensor size, and flight time.
- DJI Air 3 offers solid sensing but with a smaller sensor and inferior color science for scientific documentation.
Expert Insight: When flying survey transects through forest corridors, set the Mavic 4 Pro's obstacle avoidance to Bypass mode rather than Brake mode. Brake mode causes the drone to hover when it detects an obstacle, creating gaps in your transect data. Bypass mode allows the aircraft to autonomously route around obstacles while maintaining forward progress along your planned flight path.
ActiveTrack 6.0: Never Lose Your Subject Again
The single most costly failure in aerial wildlife surveys isn't a crash—it's losing the animal. Traditional manual tracking demands an expert pilot who can simultaneously manage altitude, distance, speed, and camera angle while following an unpredictable subject. One moment of distraction and hours of positioning work vanish.
ActiveTrack 6.0 on the Mavic 4 Pro changes the equation entirely. The system uses deep learning-based subject recognition that can distinguish and lock onto a specific animal even when it moves through partial occlusion—behind bushes, through tall grass, under intermittent canopy cover.
Critical settings for wildlife tracking:
- Trace mode for following animals along migration paths, game trails, or waterways
- Parallel mode for behavioral observation where you need a consistent lateral angle
- Spotlight mode when you're an experienced pilot who wants manual flight control with automated gimbal tracking
- Set tracking sensitivity to High for fast-moving species (ungulates, raptors in flight) and Standard for slower subjects (marine mammals, nesting birds)
The gap between the Mavic 4 Pro and older DJI platforms here is significant. ActiveTrack 6.0 maintains lock through 85% more occlusion scenarios than ActiveTrack 5.0 on the Mavic 3 Pro, according to DJI's own field testing data.
D-Log and the Hasselblad Advantage for Scientific Documentation
Wildlife survey footage isn't just for social media. Conservation organizations, environmental impact assessors, and research teams need footage with recoverable dynamic range across highlights and shadows. They need accurate color reproduction for species identification. They need detail in dark pelts against bright skies.
The Mavic 4 Pro's 1-inch CMOS Hasselblad sensor shoots up to 5.1K video and captures 20MP stills in D-Log color profile, delivering over 14 stops of dynamic range. This matters enormously in the field:
- Dawn and dusk surveys (peak wildlife activity) produce extreme contrast between shadowed terrain and open sky
- D-Log preserves detail in both, giving you footage that can be color-graded for scientific reporting or cinematic output
- RAW photo capture at 20MP allows cropping for identification without destroying resolution
Pro Tip: When shooting D-Log for wildlife surveys, set your exposure 0.7 stops under what the histogram suggests. The Mavic 4 Pro's sensor recovers shadow detail far better than it recovers blown highlights. In post-production, you'll retain the fur texture, feather patterns, and habitat detail that make footage scientifically viable.
Technical Comparison: Mavic 4 Pro vs. Leading Competitors for Wildlife Survey
| Feature | Mavic 4 Pro | Autel EVO II Pro V3 | Skydio S2+ | DJI Air 3 |
|---|---|---|---|---|
| Sensor Size | 1-inch CMOS | 1-inch CMOS | 1/2.3-inch CMOS | 1/1.3-inch CMOS |
| Max Video Resolution | 5.1K/50fps | 6K/30fps | 4K/60fps | 4K/100fps |
| Obstacle Sensing | Omnidirectional + Radar | 12-sensor, no radar | 6 x 4K cameras + AI | Omnidirectional vision |
| Max Flight Time | 46 min | 42 min | 27 min | 46 min |
| Subject Tracking | ActiveTrack 6.0 | Dynamic Track 2.1 | Autonomy Core | ActiveTrack 5.0 |
| Color Profile | D-Log, HLG, D-Log M | Log, D-Log | Fixed | D-Log M |
| Weight | ~900g | 899g | 800g | 720g |
| Transmission Range | 20 km | 15 km | 6 km | 20 km |
The Skydio S2+ is the only platform that rivals the Mavic 4 Pro on autonomous navigation, but its smaller sensor and 27-minute flight time make it a non-starter for remote wildlife work where every battery swap risks disturbing the environment. The Autel EVO II Pro V3 matches on sensor size but falls behind on obstacle avoidance reliability and subject tracking intelligence.
Field Deployment: Step-by-Step Wildlife Survey Protocol
Pre-Flight Preparation
- Scout your transect using satellite imagery before arriving on-site; plan waypoints that follow natural corridors (rivers, ridgelines, forest edges)
- Calibrate the IMU and compass at the survey site, not at your vehicle—magnetic declination can shift significantly over even short distances in mineral-rich terrain
- Load D-Log profile and set white balance manually to the ambient Kelvin temperature; auto white balance shifts mid-flight create inconsistencies in species ID footage
- Set RTH (Return to Home) altitude at least 15 meters above the tallest canopy in your survey area
During the Survey
- Maintain a minimum altitude of 30 meters over sensitive nesting sites; many jurisdictions require this as a legal minimum
- Use QuickShots Dronie or Circle modes to capture standardized habitat assessment clips at waypoints—these provide consistent, repeatable data frames
- Deploy Hyperlapse in Free mode for documenting landscape-scale habitat changes over extended observation windows
- Keep the drone's speed below 8 m/s when ActiveTrack is engaged to maintain tracking lock through foliage
Post-Flight Data Management
- Tag all footage with GPS coordinates, altitude, time, and environmental conditions immediately
- Back up to two separate drives before leaving the field; remote locations rarely offer second chances
- Process D-Log footage using DaVinci Resolve or Adobe Premiere with a LUT calibrated for the Hasselblad color science
Common Mistakes to Avoid
- Flying too fast through canopy: The obstacle avoidance system is exceptional, but physics still applies. Exceeding 12 m/s in forested environments reduces the system's reaction window below safe margins.
- Using auto exposure in D-Log: The camera will hunt for exposure mid-flight, creating pulsing footage that's unusable for behavioral analysis. Lock exposure manually.
- Ignoring wind shear at altitude transitions: Moving from sheltered valleys to ridgelines introduces sudden crosswinds. The Mavic 4 Pro handles Level 6 winds, but sudden gusts above tree lines can drain battery 30-40% faster than calm conditions.
- Deploying without a visual observer: In remote terrain, maintaining line of sight is often impossible solo. A second team member monitoring the video feed and airspace dramatically reduces incident risk.
- Neglecting propeller inspection between flights: Nicks from dust, insects, or minor contact create vibrations that degrade both flight stability and image sharpness. Carry at least 3 sets of replacement props per field day.
Frequently Asked Questions
Can the Mavic 4 Pro fly in rain during wildlife surveys?
The Mavic 4 Pro is not officially IP-rated for rain operations. Light mist is generally tolerable based on field experience, but sustained rain risks moisture intrusion through motor bearings and gimbal mechanisms. For rainy-season wildlife surveys, consider a rain cover accessory and limit flights to breaks in precipitation.
How does ActiveTrack 6.0 handle multiple animals in a herd?
ActiveTrack 6.0 allows you to select a specific subject within a group by drawing a bounding box on the controller screen. The AI differentiates individuals based on shape, size, and movement pattern. In herds of visually identical animals (e.g., wildebeest, caribou), tracking can occasionally jump between individuals. In these scenarios, use Spotlight mode with manual flight to maintain control over which animal the gimbal follows.
What is the best time of day to conduct aerial wildlife surveys with the Mavic 4 Pro?
The first 90 minutes after sunrise and the last 90 minutes before sunset consistently produce the highest wildlife activity across most terrestrial species. The Mavic 4 Pro's D-Log profile and large sensor handle the low-angle light well, but you should manually set ISO to no higher than 800 to avoid noise that compromises species identification detail in shadowed subjects.
The Mavic 4 Pro isn't just a better drone for wildlife surveys—it's the first sub-1 kg platform that genuinely replaces the need for heavier, more expensive commercial systems in most remote fieldwork scenarios. Its combination of intelligent obstacle avoidance, precise subject tracking, and professional-grade imaging makes it the standard for serious survey operators.
Ready for your own Mavic 4 Pro? Contact our team for expert consultation.