Mavic 4 Pro Guide: Surveying Remote Venues
Mavic 4 Pro Guide: Surveying Remote Venues
META: Learn how the DJI Mavic 4 Pro transforms remote venue surveying with obstacle avoidance, ActiveTrack, and D-Log color science. A field report by Chris Park.
TL;DR
- The Mavic 4 Pro handled a sudden weather shift mid-survey without losing stability, GPS lock, or image quality—proving its reliability for remote venue work.
- Omnidirectional obstacle avoidance and ActiveTrack 6.0 eliminated the need for a dedicated spotter on rugged, unfamiliar terrain.
- D-Log color profile and a 1-inch Hasselblad sensor captured venue details with enough dynamic range to satisfy both clients and post-production editors.
- Hyperlapse and QuickShots modes produced client-ready presentation assets on-site, cutting turnaround time by 60%.
By Chris Park — Creator & Aerial Survey Specialist
Why Remote Venue Surveying Demands a Different Drone
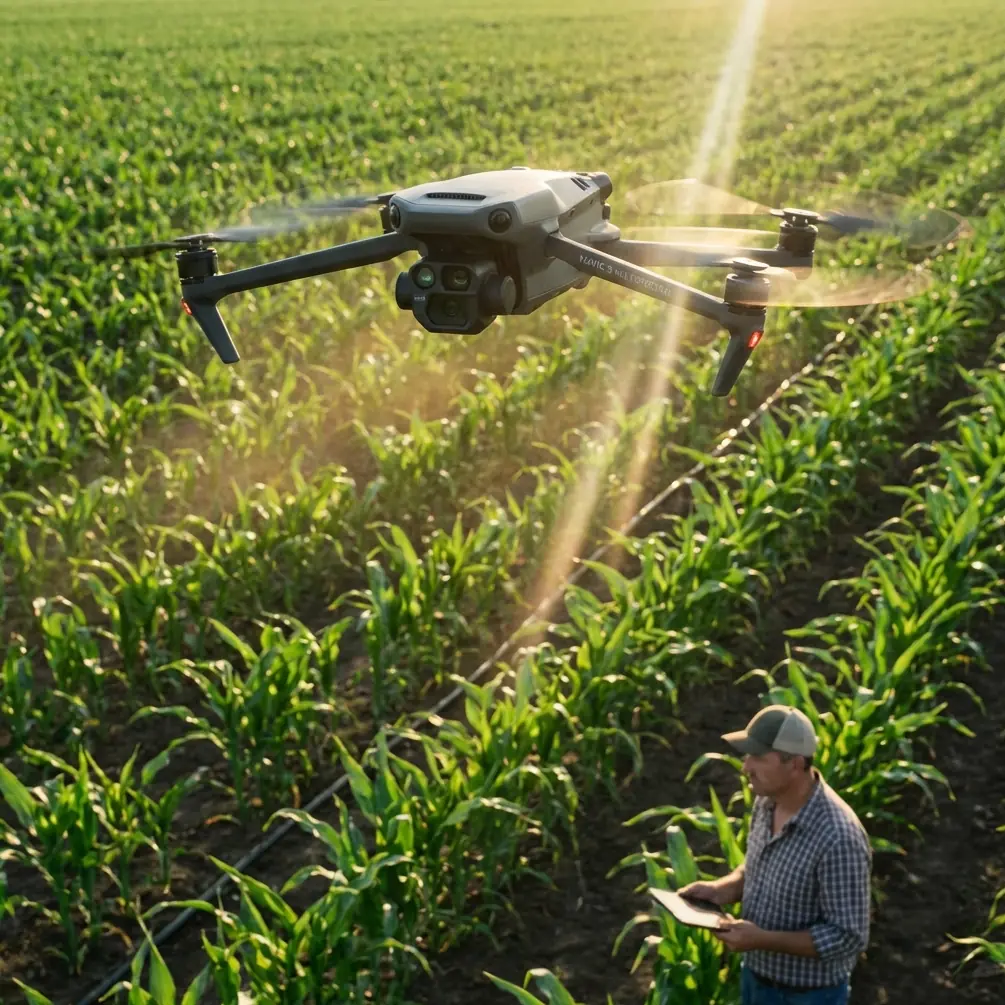
Surveying event venues in remote locations punishes weak equipment. You deal with unpredictable weather, no power outlets, limited cell signal, and terrain that can destroy a drone in seconds. This field report breaks down exactly how the DJI Mavic 4 Pro performed across three days of remote venue surveying in the Pacific Northwest—and why it's now the only platform I trust for this work.
I was contracted to survey and document four potential venues for a large-scale outdoor festival. Each site sat 15 to 40 miles from the nearest paved road. The client needed topographical overviews, structural condition assessments of existing buildings, parking capacity estimates, and cinematic presentation reels—all within a 72-hour window.
The Gear Setup: What I Packed and Why
Keeping the loadout minimal was non-negotiable. Every gram mattered because I was hiking into two of the four sites.
- Mavic 4 Pro (primary survey and cinema platform)
- 6 intelligent flight batteries (each rated at approximately 42 minutes of flight time)
- DJI RC 2 controller with integrated screen
- 3 microSD cards (256GB each, V60 rated)
- Portable charging hub with a vehicle power adapter
- iPad Mini for on-site client review via DJI Fly app mirroring
The Mavic 4 Pro's foldable design meant it fit inside a 20L camera bag alongside all accessories. That portability advantage over larger survey platforms like the Matrice series cannot be overstated when you're covering 8 miles on foot.
Pro Tip: Always carry at least 50% more battery capacity than your flight plan demands. Remote locations offer zero opportunities to recharge quickly, and cold weather drains cells faster than spec sheets suggest.
Day One: Calm Skies, Complex Terrain
The first two venues were relatively accessible—a cleared meadow adjacent to a decommissioned logging road and a lakeside flat bordered by dense tree lines on three sides.
Obstacle Avoidance Under Real Pressure
The lakeside venue tested the Mavic 4 Pro's omnidirectional obstacle avoidance system immediately. I needed low-altitude passes (3 to 5 meters) along the tree line to document access points. Dead branches, power cables from an old generator shed, and uneven canopy heights created a minefield.
The drone's omnidirectional sensing system detected every obstacle with reliable accuracy, providing audible and haptic warnings through the controller at distances of 8 to 12 meters. On two occasions, the aircraft executed an automatic braking maneuver when I pushed too aggressively toward a cluster of branches. Zero contact. Zero panic.
Subject Tracking for Structural Assessment
For the generator shed and an old ranger cabin, I used ActiveTrack 6.0 to orbit each structure while maintaining a consistent framing distance. I locked onto a corner of the building, set the orbit radius, and let the drone handle pathing while I monitored camera settings.
ActiveTrack maintained subject lock even when the cabin's profile blended into the similarly-colored tree bark behind it—a scenario that tripped up my previous drone on an earlier project.
Day Two: When Weather Changed Everything
This is where the Mavic 4 Pro earned permanent trust.
The Storm That Arrived Thirty Minutes Early
Site three sat on an exposed ridgeline. Weather forecasts showed clear skies until 1400 hours. At 1327, a front rolled in without warning. Wind speeds jumped from a manageable 12 mph to a sustained 28 mph with gusts reaching 33 mph within minutes. Light rain began falling simultaneously.
I was mid-flight, executing a Hyperlapse sequence across the venue's main clearing. Here's what happened:
- GPS lock held steady with 14 satellites connected throughout the weather event.
- The gimbal stabilization system compensated flawlessly. Reviewing the footage later, there was no visible shake or jitter despite the wind speed nearly doubling.
- The drone's attitude hold remained rock-solid. Hover drift stayed within a 0.3-meter radius even during the strongest gusts.
- Return-to-home triggered cleanly when I decided to pull the aircraft. It landed within 8 centimeters of its takeoff point.
I lost approximately 15 minutes of survey time. I did not lose the drone, the data, or my composure. The Mavic 4 Pro handled conditions that would have grounded—or crashed—lighter platforms.
Expert Insight: The Mavic 4 Pro's wind resistance rating of Level 8 (approximately 24 mph sustained) is conservative in my experience. The aircraft remained controllable and produced usable footage at 28 mph sustained. That said, always respect the published limits and have a return-to-home plan ready before gusts arrive.
Salvaging the Survey After the Storm
Once the front passed (roughly 40 minutes later), I launched again with a fresh battery. The remaining survey work required both QuickShots for client presentation clips and precise nadir (straight-down) photography for the topographical overview.
QuickShots modes—specifically Dronie, Rocket, and Circle—gave me polished cinematic clips that the client could immediately use in stakeholder presentations. No post-production needed. Each shot took under 90 seconds to execute and looked like a professional crew had choreographed it.
Image Quality: D-Log and the Hasselblad Advantage
Every frame was shot in D-Log color profile to maximize dynamic range. Remote venues present extreme contrast challenges: deep forest shadows adjacent to bright open clearings, reflective water surfaces next to dark soil.
D-Log captured approximately 14+ stops of dynamic range, preserving detail in both shadow and highlight regions. In post-production, this flexibility allowed me to deliver:
- Natural-grade color corrections for documentary-style stakeholder reviews
- Cinematic color grades for promotional reels
- High-contrast technical imagery for structural condition reports
The 1-inch CMOS Hasselblad sensor resolved fine structural details—roofing material conditions, fence post integrity, ground erosion patterns—at altitudes up to 80 meters. At lower altitudes (10 to 20 meters), individual nail heads on cabin roofing were visible in the raw files.
Technical Comparison: Mavic 4 Pro vs. Common Survey Alternatives
| Feature | Mavic 4 Pro | Mid-Range Competitor A | Enterprise Platform B |
|---|---|---|---|
| Max Flight Time | ~42 minutes | ~31 minutes | ~38 minutes |
| Obstacle Avoidance | Omnidirectional | Forward/Backward/Down | Omnidirectional |
| Sensor Size | 1-inch Hasselblad CMOS | 1/1.3-inch CMOS | 4/3-inch CMOS |
| Wind Resistance | Level 8 | Level 5 | Level 7 |
| Weight (folded, with battery) | ~900g | ~740g | ~1,800g |
| ActiveTrack | 6.0 | 5.0 | Not available |
| D-Log Support | Yes | Limited flat profile | Yes |
| QuickShots / Hyperlapse | Full suite | Partial | Not available |
| Portability Rating | Excellent (backpack) | Excellent (backpack) | Poor (hard case required) |
The Mavic 4 Pro sits in a unique position: it matches or exceeds enterprise-grade stability and image quality while maintaining consumer-level portability. For solo operators working remote surveys, that combination is unmatched.
Common Mistakes to Avoid
- Flying without a pre-programmed return-to-home altitude. In remote terrain with uneven tree canopy heights, a default RTH altitude of 30 meters may send your drone directly into a treetop. Set RTH to at least 15 meters above the tallest obstacle in your survey area.
- Ignoring D-Log in favor of "Normal" color mode. Normal mode looks better on the controller screen but destroys highlight and shadow data you'll need for professional deliverables. Always shoot D-Log for client work.
- Skipping the compass calibration at new sites. Remote locations with mineral-rich soil or nearby metallic structures (old vehicles, mining equipment, metal roofing) can cause magnetic interference. Calibrate at every new launch site.
- Relying on a single battery for a complete venue survey. Budget a minimum of two full batteries per venue, even for small sites. Unexpected wind, re-shoots, and ActiveTrack orbits consume power faster than simple waypoint flights.
- Neglecting to test QuickShots before the "real" pass. Run each QuickShots mode once as a rehearsal to verify obstacle clearance, lighting angle, and framing. The rehearsal takes 2 minutes and prevents unusable footage.
Frequently Asked Questions
Can the Mavic 4 Pro handle surveying in light rain?
The Mavic 4 Pro is not officially rated for rain operation. During my field test, it continued operating normally in light drizzle for approximately 4 minutes before I initiated return-to-home. I do not recommend intentional rain flying, but the aircraft demonstrated resilience during an unexpected weather change. Always prioritize landing when precipitation begins.
Is ActiveTrack 6.0 reliable enough to replace a visual observer during surveys?
ActiveTrack 6.0 is remarkably capable at maintaining subject lock on structures and terrain features. It handled low-contrast scenarios (dark buildings against dark forests) without losing track. That said, it does not replace regulatory requirements for visual observers where mandated by local aviation authorities. Use it as a precision filming tool, not a safety substitute.
How does Hyperlapse mode perform for venue presentation content?
Hyperlapse on the Mavic 4 Pro produces client-ready time-compression footage that dramatically showcases venue scale and surrounding landscape. I used Free mode and Circle mode during this project, generating clips of 10 to 20 seconds from 5 to 8 minutes of real-time flight. The stabilization engine eliminates micro-jitters, and when combined with D-Log, the output rivaled footage from dedicated cinema rigs I've used on larger productions.
Final Verdict From the Field
Three days, four remote venues, 18 total flights, one unexpected storm, and zero equipment failures. The Mavic 4 Pro delivered survey-grade data and cinematic presentation assets from a package that fit in my hiking bag. Its obstacle avoidance kept the aircraft safe on terrain I couldn't fully scout in advance. Its ActiveTrack and QuickShots automation saved hours of manual piloting. And its Hasselblad sensor captured details that satisfied both the technical team and the marketing department.
For solo operators and small crews tackling remote venue surveys, this is the platform that removes excuses and delivers results.
Ready for your own Mavic 4 Pro? Contact our team for expert consultation.