Mavic 4 Pro for Windy Solar Farm Mapping
Mavic 4 Pro for Windy Solar Farm Mapping: A Practical Field Workflow
META: A field-tested guide to using Mavic 4 Pro for solar farm mapping in windy conditions, with workflow tips, sensor strategy, and lessons drawn from large-scale drone deployment in real estate.
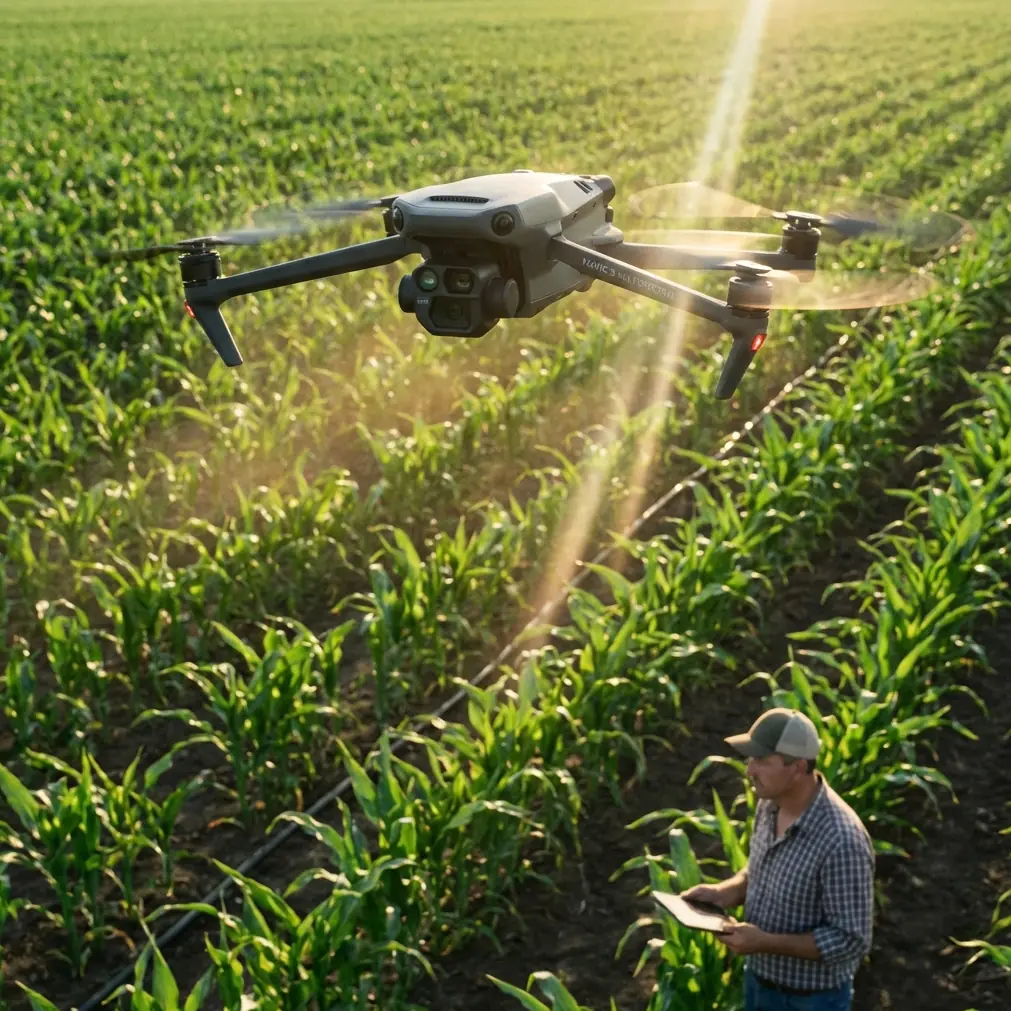
Wind changes everything on a solar site.
Panels create turbulence. Open ground gives gusts room to build. Heat shimmer starts to affect image clarity by late morning. And if you are mapping a utility-scale array, a small inefficiency at takeoff becomes a large problem by the time you have covered dozens of hectares.
That is why the most useful way to think about the Mavic 4 Pro is not as a spec-sheet object, but as a production tool. If your job is mapping solar farms in windy conditions, the real question is simple: can this aircraft help you collect repeatable, high-quality data without turning every mission into a hand-flown rescue exercise?
The answer depends less on hype and more on workflow discipline.
I want to frame that with a lesson from a very different sector: real estate. One of the most revealing case studies in commercial drone operations came from Keller Williams working through the DroneBase platform. The headline detail was scale. DroneBase and DJI supported aerial imaging for a company with 120,000 real estate agents, serving more than 700 offices across dozens of countries. The operational significance was not just that drones were used. It was that a standardized platform, consistent aircraft quality, and dependable delivery turned aerial imaging from a novelty into a repeatable business process.
That matters for solar mapping because the same principle applies. Windy-site success is rarely about one heroic pilot. It comes from consistency: same preflight checks, same capture logic, same sensor behavior, same output standards. Real estate proved that when the workflow is unified, drone imagery becomes scalable. Solar mapping demands even more discipline because your output is not just visually attractive media. It is positional data, panel-level context, and a record that may support maintenance planning, progress tracking, or contractor verification.
Why windy solar mapping is harder than it looks
Many pilots underestimate how strange airflow can become over a solar farm. A wide, open site looks forgiving from the parking area. Then you climb over panel rows and discover irregular crosswinds, vertical drafts near embankments, and pockets of turbulence around inverter stations or perimeter vegetation.
This is where obstacle awareness and flight path intelligence stop being convenience features.
On a recent rural site, a flock of egrets lifted from a drainage strip beside the array just as the aircraft was transitioning to its next line. That kind of wildlife encounter is not rare on solar farms. Birds are drawn to retention ponds, open service roads, and disturbed ground. The drone’s sensing and avoidance logic mattered in a very practical way: not because you want dramatic autonomous behavior, but because any extra margin for situational awareness helps when wind, terrain, and wildlife all compete for pilot attention at once.
The right response is not to rely blindly on automation. It is to use automation selectively, with full understanding of what the aircraft is doing and what the site is likely to throw at it.
Step 1: Treat the mission like a data job, not a flying job
Before I even think about wind limits, I define the deliverable.
Are you building an orthomosaic for layout verification? A progress map for EPC stakeholders? A visual inspection layer to flag damaged rows or washout zones? A baseline archive before vegetation management?
That decision determines altitude, overlap, speed, and lighting tolerance.
Too many operators use one “safe” mission template for everything. On a windy solar site, that is inefficient. If you need mapping-grade coverage, your priority is overlap integrity and consistent shutter timing. If you need a visual maintenance layer, you may accept lower area efficiency in exchange for tighter framing around combiner boxes, access lanes, or drainage features.
The Mavic 4 Pro becomes more useful when you stop asking whether it can “do mapping” and instead define exactly what quality threshold the map has to meet.
Step 2: Build around the weather window, not the calendar slot
Windy-site operators often make the same scheduling mistake that real estate teams once did before standardized drone services matured: they plan around business convenience rather than image quality.
The DroneBase model worked because it emphasized predictable service delivery. According to the source material, clients in 26 countries could select a property or jobsite and receive aerial imagery within a week. The significance here is not the turnaround time alone. It is the discipline behind it. Quality output at scale requires matching aircraft deployment to conditions, rather than improvising every assignment.
For solar work, your best mapping window is usually earlier than stakeholders want and shorter than they expect.
Morning often gives you the cleanest air, lower thermal disturbance, and more manageable gust behavior. If winds are forecast to build after 10 a.m., design the mission so the highest-priority block is captured first. Do not save the critical section for “after the easy area.” Wind will not reward that optimism.
A simple rule: launch when the weather is still trending in your favor, not after it has already started to deteriorate.
Step 3: Use obstacle avoidance intelligently, not continuously by habit
Obstacle avoidance is valuable on solar sites, but it is not magic.
Rows are repetitive. Reflections can be tricky. Low sun angles can complicate visual interpretation. Perimeter fencing, weather stations, cable spools, and temporary construction equipment can all create surprises. For repositioning, low-altitude transitions, and inspection-style passes, obstacle sensing adds real protection. It reduces the chance that a momentary distraction becomes a repair invoice.
But mapping runs are different. In strong or inconsistent wind, you want smooth, predictable aircraft behavior. If the aircraft is constantly second-guessing route geometry because of reflective surfaces or edge features, your line discipline can suffer. The pilot’s job is to decide where avoidance helps and where stable mission execution matters more.
That distinction is especially important on mixed-use solar sites where construction may still be ongoing in one block while another block is already commissioned.
Step 4: Keep subject tracking and creative modes in their lane
The Mavic line is known for tools like ActiveTrack, QuickShots, Hyperlapse, and automated subject behavior. Those features are valuable, but for solar mapping they need context.
ActiveTrack can be useful for site-documentation segments when you want to follow a maintenance vehicle or capture a repeatable visual of a perimeter inspection route. QuickShots and Hyperlapse can support stakeholder reporting, progress summaries, or marketing material for civilian energy projects. They are not your primary mapping tools.
That separation matters because many teams mix cinematic capture and survey capture in one battery without a clear plan. Wind punishes that approach. You burn your cleanest battery minutes on footage that looks good in a meeting, then attempt the actual grid collection after gusts have built.
My recommendation is simple: split your mission logic.
- Map first, while conditions are best.
- Capture supplemental visuals second.
- Use tracking and cinematic modes only when the data mission is secure.
This sounds obvious until a client representative asks for “one quick orbit” before you begin the grid. On a windy site, that one orbit can cost the battery reserve you later need for a controlled return.
Step 5: Watch ground speed variation like a hawk
In calm air, a planned route is mostly just geometry. In wind, it becomes geometry plus energy management.
A tailwind leg can make you feel efficient. The headwind return reveals the truth. If your ground speed is dropping more than expected on the return direction, your overlap and timing assumptions may no longer hold. That affects data quality and battery margin at the same time.
This is where experienced operators earn their keep. They are not dazzled by a fast outbound segment. They monitor whether the aircraft is working harder than the mission plan assumed. On a solar farm, especially a long rectangular one, that awareness keeps you from pushing too deep into the site and discovering too late that your return profile is ugly.
Windy mapping is less about bravery than humility.
Step 6: Use D-Log when the site actually benefits from it
D-Log has real value on solar facilities, especially where you need to preserve highlight detail on reflective surfaces while holding shadow information around under-panel access areas, equipment pads, or drainage cuts.
But let’s be precise. If your primary deliverable is mapping data, your first concern is consistency and processing reliability. D-Log shines more in supplemental documentation, stakeholder reporting, and conditions where post-production latitude matters.
On bright solar fields, dynamic range management can help you avoid clipped highlights on highly reflective panel surfaces. That said, if your team does not have a disciplined color pipeline, flat footage can create more work than value. Use D-Log because your downstream workflow can exploit it, not because it sounds professional.
Step 7: Build a repeatable handoff process
This is another place where the DroneBase reference is quietly useful. Keller Williams did not benefit just because DJI aircraft like the Inspire 1, Phantom 4, and Phantom 3 Professional produced HD aerial imagery. They benefited because the service model delivered that imagery in a consistent, economical way across a huge network.
For solar operators, the direct lesson is this: the aircraft is only half the system.
You need naming conventions, mission logs, wind notes, battery traceability, image set separation, and a clear path from field capture to processed output. If one pilot labels arrays by parcel number and another uses inverter-zone nicknames, your archive becomes harder to search and compare over time. If one operator flies supplemental inspection passes without logging them separately, the data team wastes time sorting mixed capture sets.
That may sound administrative. It is actually operational. Large sites generate enough imagery that bad organization becomes a hidden cost.
If your team is refining a solar mapping workflow around Mavic-class aircraft and needs a practical field conversation, you can message a drone workflow specialist here.
Step 8: Respect wildlife and site ecology as operational variables
The egret incident I mentioned earlier is worth revisiting.
The bird did what birds often do on utility sites: it rose late, crossed unexpectedly, and forced a quick pilot decision. The sensors helped, but the bigger takeaway was mission planning. Drainage features, retention areas, and vegetated margins deserve extra attention in your route design. Wildlife movement is not random when you understand the site. It clusters around water, shade, and edge habitat.
That has two practical implications:
- avoid unnecessary low-altitude transitions near likely bird activity zones
- brief visual observers to watch ecological edges, not just the aircraft
This is one of those details that separates operators who merely fly over infrastructure from those who truly work in it.
Step 9: Know when to stop
A mature drone program is defined as much by aborted flights as completed ones.
If the wind has shifted from manageable to chaotic, if panel reflections are interfering with route confidence, if birds are active in the corridor you need, or if the aircraft is consuming battery faster than modeled, stopping is not failure. It is quality control.
Real estate companies scaled drone imagery because they rejected inconsistency. Keller Williams needed something better than fragmented suppliers with varying quality, price, and efficiency. That source detail matters here because solar mapping faces the same trap. If every windy-site mission is handled by improvisation, your outputs will vary too much to trust for long-term program use.
The Mavic 4 Pro is most valuable when it sits inside a system that recognizes bad conditions early and protects data standards.
A practical windy-site checklist for Mavic 4 Pro operators
Here is the field version I give teams:
- Define the deliverable before battery one leaves the case.
- Fly the most important grid block during the calmest window.
- Separate mapping capture from cinematic or reporting footage.
- Use obstacle avoidance with intent, especially on transitions and inspection passes.
- Monitor return-leg ground speed, not just outbound efficiency.
- Reserve D-Log for workflows that actually use its latitude.
- Log wind behavior by site zone, not just by overall forecast.
- Watch wildlife edges near water, drainage, and vegetation.
- Stop early if conditions begin to erode overlap or return margin.
None of this is glamorous. That is the point.
Solar mapping in wind is an operational discipline. The aircraft helps, especially when its sensing, tracking intelligence, and imaging tools are used for the right job at the right time. But the bigger determinant of success is whether your workflow is standardized enough to produce the same quality on a difficult Tuesday that you got on a calm Friday.
That is the real lesson buried inside the DroneBase and Keller Williams example. At commercial scale, drone value does not come from occasional impressive flights. It comes from a reliable system that turns aircraft capability into dependable output across hundreds of locations, thousands of users, and shifting field conditions.
For a pilot mapping solar farms, that is exactly the mindset to bring to the Mavic 4 Pro.
Ready for your own Mavic 4 Pro? Contact our team for expert consultation.