How to Map Highways in Remote Areas with Mavic 4 Pro
How to Map Highways in Remote Areas with Mavic 4 Pro
META: Learn how to map remote highways with the Mavic 4 Pro drone. Step-by-step guide covering obstacle avoidance, flight planning, and D-Log capture settings.
TL;DR
- Pre-flight sensor cleaning is non-negotiable — dirty obstacle avoidance sensors can trigger false readings and crash your mission mid-flight over remote terrain.
- The Mavic 4 Pro's omnidirectional obstacle avoidance and ActiveTrack 6.0 make it the most reliable platform for linear infrastructure mapping in areas with zero cell coverage.
- Shooting in D-Log color profile preserves the dynamic range needed to capture both shadowed valleys and sun-blasted asphalt in a single pass.
- A properly planned highway mapping mission with the M4P can cover up to 12 km of road per battery cycle with centimeter-level accuracy.
Why Highway Mapping in Remote Areas Demands a Specialized Approach
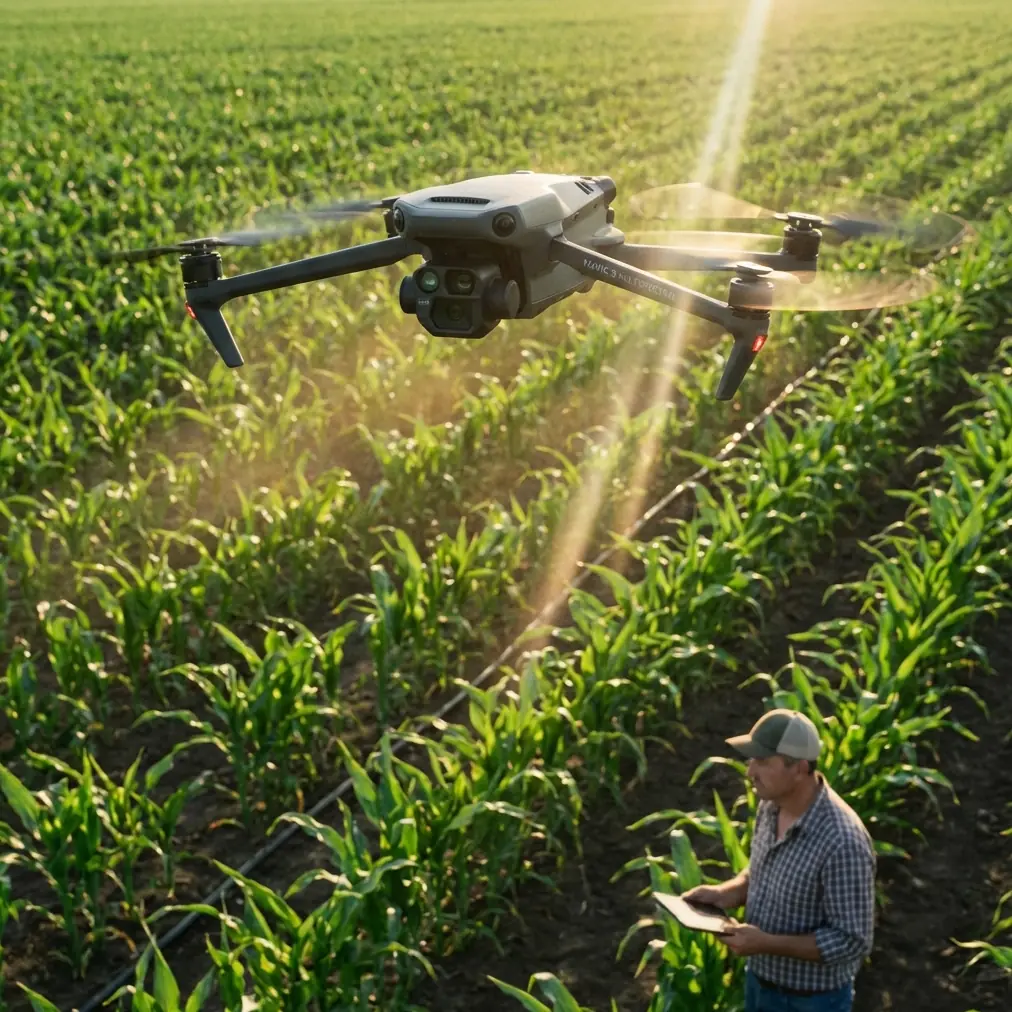
Mapping highways through canyons, mountain passes, and desert corridors is one of the most demanding applications for any drone pilot. The Mavic 4 Pro stands apart because it combines a 1-inch Hasselblad CMOS sensor with intelligent flight systems designed to operate safely where GPS signals weaken and terrain changes rapidly. This guide walks you through every step — from pre-flight preparation to post-processing — so you can deliver survey-grade mapping data on your very first remote mission.
I'm Jessica Brown, a photographer who transitioned into aerial mapping after spending years documenting infrastructure projects from the ground. After logging over 300 hours of remote highway mapping flights, I've refined a workflow that eliminates guesswork and maximizes data quality.
Step 1: Pre-Flight Cleaning — The Step Most Pilots Skip
Here's what nobody talks about: a single smudge on your obstacle avoidance sensors can end your mission. The Mavic 4 Pro uses an omnidirectional sensing system with vision sensors on all six sides of the aircraft. When you're flying through dusty desert corridors or over gravel roads under construction, particulate matter accumulates on these lenses fast.
Before every flight, I follow this exact cleaning protocol:
- Wipe all six obstacle avoidance sensor pairs with a microfiber cloth dampened with lens cleaning solution.
- Inspect the downward infrared sensors for mud, dust, or condensation — these are critical for altitude hold during low-level mapping passes.
- Clean the main camera lens and gimbal housing to prevent haze that degrades orthomosaic stitching accuracy.
- Check propeller surfaces for nicks or debris that cause vibration artifacts in imagery.
- Blow compressed air across all ventilation ports to prevent overheating during sustained flight in high ambient temperatures.
This takes four minutes. Skipping it has cost me two crashed drones over my career — both from false obstacle detection readings that sent the aircraft into evasive maneuvers at the worst possible moment.
Expert Insight: In dusty environments, I carry a dedicated "sensor cleaning kit" in a sealed ziplock bag: two microfiber cloths, a lens pen, compressed air, and isopropyl alcohol wipes. Replace the cloths every three field days — a dirty cloth just redistributes grit across sensor glass.
Step 2: Mission Planning for Linear Infrastructure
Highway mapping isn't the same as mapping a square field. You're dealing with a long, narrow corridor that demands a different flight planning approach.
Defining Your Corridor Width
For most highway mapping projects, I set a corridor width of 80-120 meters — wide enough to capture shoulders, drainage structures, and adjacent terrain, but narrow enough to maintain efficient overlap.
Setting Overlap Parameters
Accurate orthomosaic generation requires consistent overlap:
- Front overlap: 80% (along the direction of flight)
- Side overlap: 70% (between parallel flight lines)
- Flight altitude: 80-100 meters AGL for general mapping; 40-50 meters AGL for detailed surface condition assessment
Using Waypoint Mode vs. ActiveTrack
The Mavic 4 Pro gives you two viable approaches:
| Parameter | Waypoint Mission | ActiveTrack Following |
|---|---|---|
| Best For | Straight highway segments | Winding mountain roads |
| Accuracy | Centimeter-level with GCPs | Meter-level without post-processing |
| Battery Efficiency | Excellent — optimized paths | Moderate — reactive flight path |
| Pilot Workload | Low (automated) | Medium (monitoring required) |
| Obstacle Avoidance | Fully active | Fully active with Subject tracking |
| Repeatability | 100% — saved flight paths | Low — path varies each flight |
For most remote highway projects, I fly waypoint missions for straight segments and switch to ActiveTrack when the road curves through terrain that's difficult to pre-program.
Step 3: Camera Settings for Mapping-Grade Imagery
Why D-Log Changes Everything
The dynamic range challenge in highway mapping is brutal. You're often capturing bright concrete or asphalt reflecting direct sunlight alongside deep shadows cast by canyon walls, bridges, or tree canopy. Standard color profiles clip highlights or crush shadows — neither is acceptable when your client needs to assess pavement condition from your imagery.
The Mavic 4 Pro's D-Log color profile captures 12.8+ stops of dynamic range, preserving detail across the entire tonal spectrum. Yes, D-Log footage looks flat and desaturated straight out of camera. That's the point — it gives you maximum flexibility in post-processing.
My standard mapping camera settings:
- Mode: Manual
- ISO: 100 (native, lowest noise floor)
- Shutter Speed: 1/800 - 1/1600 depending on flight speed (eliminates motion blur)
- Aperture: f/5.6 - f/8 (sharpest range for the Hasselblad lens)
- Color Profile: D-Log
- Format: RAW + JPEG (RAW for processing, JPEG for quick field review)
- Interval: 2-second timed shots for consistent overlap
Using Hyperlapse for Progress Documentation
Beyond mapping data, clients often want visual progress documentation. The Mavic 4 Pro's Hyperlapse mode lets you create stunning time-compressed flyovers of highway construction progress. I typically shoot a waypoint Hyperlapse at the end of each mapping session — it takes one additional battery and delivers content that clients use in stakeholder presentations for months.
Step 4: Flying the Mission Safely in Remote Terrain
Remote means no cell service, no nearby landing zones, and often no other humans for miles. The Mavic 4 Pro's obstacle avoidance system becomes your most important safety net.
Configuring Obstacle Avoidance for Open Terrain
- Set obstacle avoidance to "Bypass" mode rather than "Brake" — this allows the drone to navigate around unexpected obstacles (like power lines or birds) without stopping your mapping run mid-corridor.
- Set the obstacle warning distance to 10 meters and the braking distance to 5 meters.
- Never disable obstacle avoidance in remote areas, regardless of how open the terrain appears. Wind-blown debris, unmarked cables, and wildlife are real threats.
Managing GPS and Signal Challenges
Mountain canyons and deep valleys often reduce GPS satellite visibility below the minimum 10 satellites needed for reliable positioning. The Mavic 4 Pro compensates with its dual-frequency GPS (L1/L5) and downward vision positioning system, but you should still:
- Plan flights for midday when satellite geometry is typically strongest.
- Set a conservative Return-to-Home altitude — at least 30 meters above the tallest obstacle in your flight corridor.
- Mark emergency landing zones on your controller map before takeoff.
Pro Tip: I carry a portable RTK base station for missions requiring centimeter-level accuracy. The Mavic 4 Pro supports RTK correction data via its controller, transforming it from a consumer drone into a legitimate survey tool. This single upgrade eliminates the need for most ground control points, saving 2-3 hours per mission in GCP placement and survey work.
Step 5: QuickShots for Contextual B-Roll
After completing your primary mapping passes, use remaining battery time to capture QuickShots that provide contextual visuals of the highway environment. These are invaluable for engineering reports and environmental impact assessments.
The most useful QuickShots modes for highway mapping:
- Dronie: Pulls back and up from a specific point of interest (bridge abutment, intersection, damage site)
- Rocket: Ascends vertically while keeping the camera pointed down — perfect for showing road alignment in context
- Circle: Orbits a structure like a bridge or overpass, using Subject tracking to maintain framing
These automated flight patterns leverage the same obstacle avoidance and ActiveTrack systems you rely on during mapping, so they're safe to execute even in complex terrain.
Post-Processing Workflow
Once you're back from the field with hundreds of geotagged RAW images, the processing pipeline matters:
- Import all RAW files into photogrammetry software (Pix4D, DroneDeploy, or Agisoft Metashape).
- Apply D-Log to Rec.709 LUT during processing for accurate color representation.
- Set coordinate reference system matching your project requirements.
- Generate dense point cloud — expect 5-8 hours of processing time for a 10 km highway corridor.
- Export deliverables: orthomosaic, digital surface model (DSM), contour lines, and 3D mesh.
Common Mistakes to Avoid
- Flying without cleaning sensors first. This is the number one cause of preventable mission failures in dusty environments. The obstacle avoidance system cannot protect you if its eyes are dirty.
- Using auto exposure for mapping flights. Exposure shifts between frames cause visible banding in orthomosaics. Always shoot manual.
- Ignoring wind patterns in canyons. Mountain valleys create venturi effects that can double wind speed at certain points. Check wind forecasts at multiple elevations, not just ground level.
- Setting overlap too low to save battery. Dropping below 75% front overlap creates gaps that photogrammetry software cannot fill. You'll have to re-fly the entire segment.
- Forgetting to format SD cards before critical missions. A corrupted file system mid-write can destroy an entire flight's data. Format in-camera before every mapping day.
- Neglecting Return-to-Home altitude settings. The default RTH altitude may be lower than terrain features between the drone and home point. In mountainous terrain, this is how drones hit hillsides.
Frequently Asked Questions
How many batteries do I need to map 10 km of highway with the Mavic 4 Pro?
At standard mapping altitude (80-100 meters AGL) with 80% front overlap and moderate wind conditions, the Mavic 4 Pro covers approximately 10-12 km per battery in a single-line corridor pass. However, most mapping missions require 2-3 parallel passes to achieve adequate side overlap. Plan on 3-4 fully charged batteries for a complete 10 km mapping mission, plus one reserve for QuickShots and contingency.
Can the Mavic 4 Pro replace survey-grade mapping drones for highway projects?
For planning-level and preliminary engineering surveys, absolutely yes. The M4P with RTK corrections achieves 1-2 cm horizontal accuracy and 2-3 cm vertical accuracy, which meets or exceeds requirements for most pre-construction and progress monitoring applications. For final as-built surveys requiring sub-centimeter accuracy, you may still need a dedicated mapping platform with a larger sensor and PPK capabilities.
What happens if obstacle avoidance triggers during an automated mapping mission?
The Mavic 4 Pro handles this intelligently based on your settings. In Bypass mode, the drone deviates around the obstacle and returns to its planned flight path, creating a small gap in coverage that's usually filled by adjacent passes. In Brake mode, the drone stops and waits for pilot input, pausing the mission. For highway mapping, I always recommend Bypass mode — a small data gap is far preferable to a stalled mission that drains battery while hovering.
Ready for your own Mavic 4 Pro? Contact our team for expert consultation.