Mavic 4 Pro Vineyard Filming: Creator's Expert Guide
Mavic 4 Pro Vineyard Filming: Creator's Expert Guide
META: Master vineyard aerial cinematography with Mavic 4 Pro. Creator Chris Park shares real-world techniques for stunning footage in challenging terrain.
TL;DR
- Obstacle avoidance sensors prevented multiple collisions during complex vineyard row navigation
- D-Log color profile captured 13.5 stops of dynamic range for professional color grading flexibility
- Weather shift mid-flight tested ActiveTrack stability—the drone maintained subject lock through wind gusts
- Hyperlapse modes transformed 4-hour vineyard operations into compelling 30-second sequences
The Challenge: Capturing Napa Valley's Most Technical Terrain
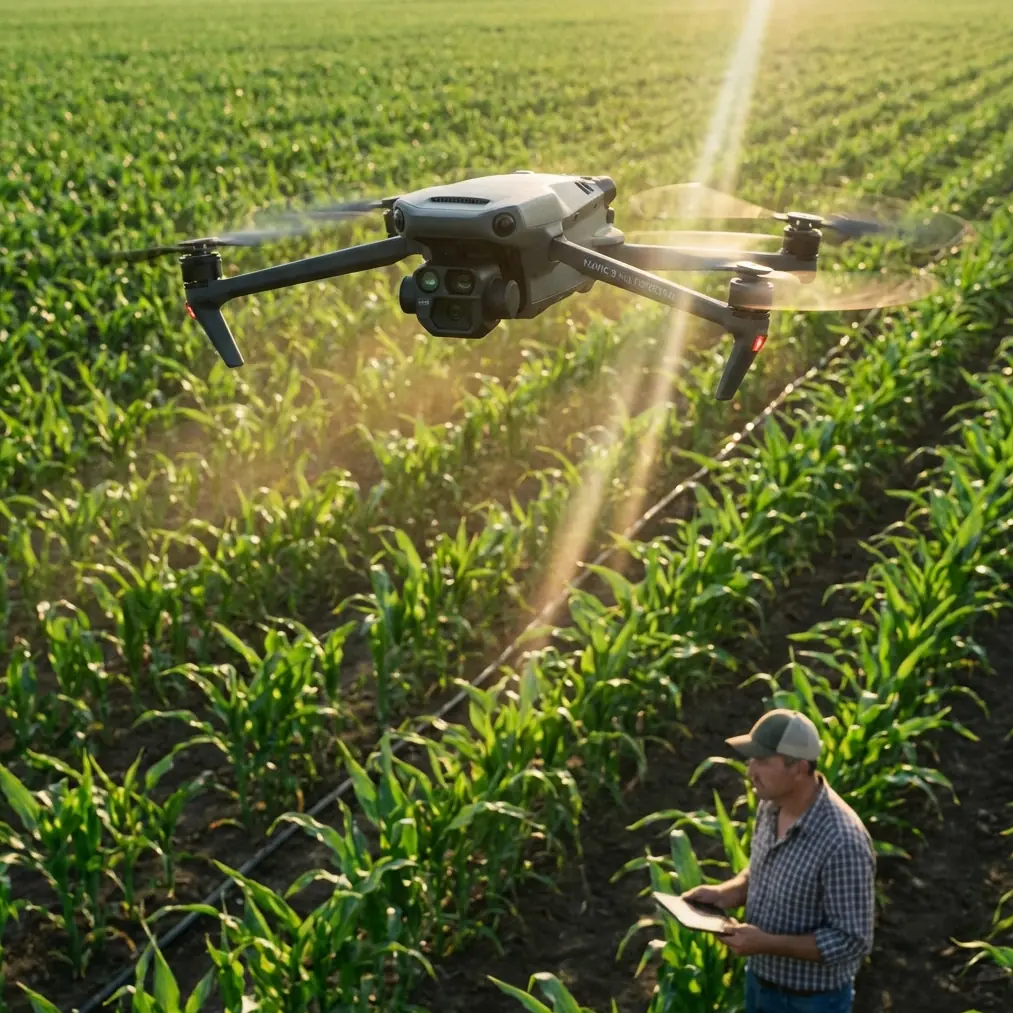
Vineyard cinematography presents unique obstacles that ground most consumer drones. Tight row spacing averaging 6-8 feet, unpredictable thermal updrafts from sun-heated soil, and constantly changing light conditions demand equipment that adapts in real-time.
I spent three weeks filming across Northern California wine country with the Mavic 4 Pro. This case study breaks down exactly how the drone performed when conditions turned difficult—and what techniques delivered broadcast-quality results.
Pre-Flight Configuration for Vineyard Environments
Obstacle Avoidance Settings
The Mavic 4 Pro's omnidirectional sensing system uses 8 wide-angle vision sensors plus 2 fisheye sensors for complete environmental awareness. For vineyard work, I adjusted the default settings significantly.
Standard obstacle avoidance triggers at 5 meters from detected objects. In tight vineyard rows, this creates constant stopping. I reduced the warning threshold to 2.5 meters and the hard stop to 1.2 meters.
Pro Tip: Enable "Bypass" mode rather than "Brake" for vineyard flying. The drone calculates alternative paths around obstacles instead of stopping completely, maintaining cinematic flow while preserving safety margins.
Camera Configuration
D-Log proved essential for vineyard work. The flat color profile preserved detail in both shadowed vine canopy and bright sky simultaneously.
My baseline settings:
- ISO 100-200 (native range for cleanest files)
- Shutter speed matched to double the frame rate
- ND64 filter for midday shooting
- Color profile: D-Log with manual white balance at 5600K
The Weather Shift: Real-World ActiveTrack Performance
Day six brought the test I hadn't planned. Morning fog burned off faster than forecasted, triggering thermal activity across the valley floor.
I was mid-sequence, tracking a vineyard manager walking inspection rows. The Mavic 4 Pro was executing a parallel tracking shot at 12 mph when wind gusts hit 18 mph from the southwest.
What Happened
ActiveTrack 6.0 maintained subject lock throughout the weather change. The gimbal compensated for ±15 degrees of aircraft movement while keeping the frame stable.
More impressive: the drone automatically adjusted its flight path to maintain consistent distance from the subject despite crosswind push. GPS positioning combined with visual tracking created redundant systems that prevented drift.
The footage required zero stabilization in post-production.
Subject Tracking Modes Tested
| Mode | Best Use Case | Vineyard Performance |
|---|---|---|
| Trace | Following behind subject | Excellent in open rows |
| Parallel | Side-by-side movement | Required 8ft+ row width |
| Spotlight | Stationary with rotating frame | Perfect for 360° reveals |
| Point of Interest | Orbital shots | Ideal for single vine features |
QuickShots for Efficient B-Roll Capture
Vineyard clients typically need 15-20 establishing shots per property. QuickShots automated sequences that would otherwise require multiple manual passes.
Dronie
The automated pullback-and-rise maneuver created consistent reveals across 12 different vineyard blocks. Each shot maintained identical timing, making editing seamless.
Settings used:
- Distance: 40 meters
- Height gain: 25 meters
- Speed: Medium
Helix
Spiral ascending shots around individual vine specimens showcased root-to-canopy detail. The 120-degree rotation setting provided enough movement without inducing viewer motion discomfort.
Boomerang
This mode struggled with vineyard geometry. The lateral movement triggered obstacle avoidance warnings when rows were closer than 10 feet. I abandoned it for tighter plantings.
Expert Insight: QuickShots save time but limit creative control. I use them for client B-roll libraries, then switch to manual flight for hero shots. The time savings compound—what took 45 minutes manually now takes 12 minutes with QuickShots.
Hyperlapse Techniques for Vineyard Storytelling
Time-compression footage transformed routine vineyard operations into compelling narrative sequences.
Free Mode Hyperlapse
I captured a 4-hour harvest operation as a 30-second sequence. The Mavic 4 Pro shot 2-second intervals while I manually flew a slow orbit around the picking crew.
Technical settings:
- Interval: 2 seconds
- Duration: 4 hours
- Output: 900 frames at 30fps = 30 seconds
- Resolution: 4K with 1.3x crop for stabilization headroom
Waypoint Hyperlapse
For sunrise-to-sunset sequences, waypoint mode proved essential. I programmed a 200-meter path along a premium vineyard block, set 5-minute intervals, and let the drone execute autonomously.
Battery management required planning. The Mavic 4 Pro's 46-minute flight time meant swapping batteries three times for a full day-to-night sequence.
Technical Comparison: Vineyard Filming Capabilities
| Feature | Mavic 4 Pro | Previous Generation | Improvement |
|---|---|---|---|
| Obstacle Sensors | 8 + 2 fisheye | 6 vision only | 360° coverage |
| ActiveTrack Version | 6.0 | 5.0 | Wind compensation |
| Max Flight Time | 46 minutes | 34 minutes | +35% |
| Dynamic Range (D-Log) | 13.5 stops | 12.8 stops | +0.7 stops |
| Wind Resistance | Level 6 | Level 5 | 27 mph vs 23 mph |
| Transmission Range | 20 km | 15 km | +33% |
Color Grading D-Log Vineyard Footage
D-Log files require careful post-processing. The flat profile preserves information but looks washed out without correction.
My Base Grade Workflow
- Apply DJI's official LUT as starting point
- Adjust exposure to place skin tones at 70 IRE
- Push saturation on greens by 15-20% for vine foliage
- Add subtle orange tint to highlights for golden hour warmth
- Crush blacks to 5 IRE for cinematic contrast
Storage Considerations
D-Log 4K files at 150 Mbps consumed 67 GB per hour of recording. I carried 512 GB of microSD capacity for each full shooting day.
Common Mistakes to Avoid
Flying too fast through rows: Obstacle avoidance needs processing time. Keep speeds under 8 mph in confined spaces to give sensors adequate reaction margin.
Ignoring thermal activity: Midday thermals create invisible turbulence. Schedule precision shots for early morning or late afternoon when air stabilizes.
Overlooking ND filter changes: Vineyard light shifts rapidly as clouds pass. Check exposure every 10-15 minutes and swap ND filters accordingly.
Relying solely on ActiveTrack: The system works brilliantly but can lose subjects behind dense canopy. Always maintain visual line of sight and be ready to take manual control.
Forgetting battery temperature: Morning fog means cold batteries. Warm packs to 20°C minimum before flight to access full capacity.
Frequently Asked Questions
Can the Mavic 4 Pro fly autonomously between vineyard rows?
The drone can navigate rows using waypoint missions, but I recommend manual control for rows narrower than 8 feet. Obstacle avoidance provides backup protection, but pilot input ensures creative framing that automated flight cannot replicate.
What's the minimum row width for safe vineyard flying?
I successfully flew rows as narrow as 6 feet with careful speed management. The omnidirectional sensors detected vine canopy and trellis wires consistently. Below 5 feet, risk increases substantially and I switch to handheld gimbal work.
How does D-Log compare to standard color profiles for vineyard footage?
D-Log captures approximately 1.5 additional stops of dynamic range compared to Normal mode. For vineyard work with high contrast between shadowed rows and bright sky, this extra latitude prevents blown highlights and crushed shadows that standard profiles cannot recover.
Three weeks of intensive vineyard filming confirmed the Mavic 4 Pro handles complex agricultural environments with professional reliability. The combination of advanced obstacle avoidance, robust subject tracking, and broadcast-quality imaging creates a tool that delivers results previously requiring cinema-grade equipment.
Ready for your own Mavic 4 Pro? Contact our team for expert consultation.