How I’d Use the Mavic 4 Pro to Film Remote Venues Without Wa
How I’d Use the Mavic 4 Pro to Film Remote Venues Without Wasting Battery, Light, or Access
META: A practical Mavic 4 Pro field guide for photographing remote venues, with flight altitude advice, obstacle avoidance strategy, ActiveTrack use, D-Log workflow, and shot planning tips.
Remote venues look cinematic for a reason. They tend to sit where terrain does the design work: ridgelines, coastlines, forests, desert flats, vineyard slopes. Beautiful to shoot, yes. Easy to cover efficiently with a drone? Not always.
When I’m documenting a remote venue for a client, the assignment is rarely just “get pretty aerials.” The actual brief is more demanding. Show access routes. Reveal the relationship between the venue and the surrounding landscape. Make the place feel reachable, private, and worth the trip. Capture enough variety for web headers, social clips, booking pages, and sometimes a launch reel. Do it safely, often in wind, with limited setup time and no easy place to recharge.
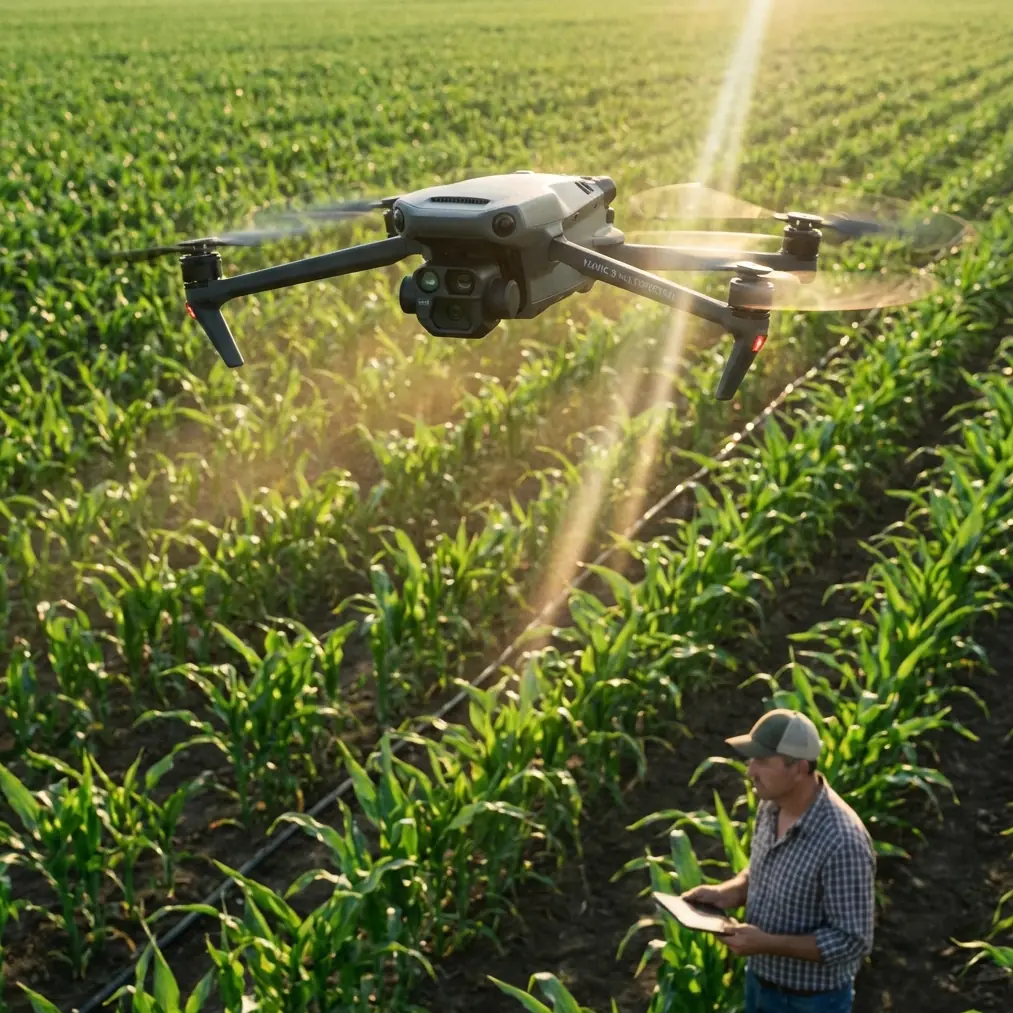
That is exactly where a platform like the Mavic 4 Pro earns its place. Not because it makes every shot automatic, but because its mix of obstacle avoidance, subject tracking, QuickShots, Hyperlapse tools, and D-Log recording gives you options when the location fights back. In remote venue work, options are everything.
This is how I would approach the job.
Start with the story, not the aircraft
A remote venue can fail on camera if you only chase dramatic altitude. High shots are seductive. They also flatten the practical questions people actually have when they’re considering the location.
Can guests find it? How isolated is it? What does arrival feel like? How close is the ceremony lawn to the lodge, the reception tent, the cliff edge, the dock, the parking area?
Those answers rarely live at maximum height. They live in the middle band, where architecture and landscape still read together.
My default working altitude for venue coverage is usually 40 to 60 meters above ground level for the core establishing material. That range is high enough to separate the property from foreground clutter, but low enough to preserve the details that matter operationally: road access, building layout, event flow, tree lines, nearby hazards, and the real scale of the site.
If I climb much higher too early, the venue starts to become a pin on a topographic map. That can be useful for one hero reveal, but it’s not the shot that helps a planner understand logistics or helps a couple imagine the day unfolding.
For remote venues specifically, I think in three altitude layers:
- 20 to 35 meters for intimacy and approach shots
- 40 to 60 meters for the most useful establishing angles
- 70 meters and above only when the surrounding geography is part of the selling story
That middle layer is where the Mavic 4 Pro’s obstacle avoidance system becomes especially relevant. In remote properties, your biggest threats are often not obvious buildings. They’re tree canopies, isolated utility lines, uneven ridges, and terrain that rises faster than it appears on a screen. Reliable sensing matters more when you’re flying lateral moves around a venue edge or backing up over sloped ground to widen the composition.
The first pass should answer practical questions
My opening flight is never the “cinematic” one. It’s the reconnaissance pass.
I’ll usually launch and build a sequence in this order:
- A medium-altitude orbit to understand the site footprint
- A slow lateral pass showing the main access road
- A push-in that simulates guest arrival
- A higher pullback to show isolation and surrounding terrain
- A short hover at each side of the venue to evaluate wind and signal behavior
This is where the Mavic 4 Pro’s stability and automated capture tools can help, but only if you use them selectively. QuickShots are useful for producing clean, repeatable moves when time is short, especially if you need multiple versions of a reveal. I would not use them as a replacement for site-specific judgment. At a remote venue, automated motion can put the aircraft on a path that looks elegant on a map but ignores branches, elevation changes, or thin structures that become an issue at the edges of the frame.
Obstacle avoidance reduces that risk, but it does not eliminate the need to read the site like a pilot instead of a content creator.
That distinction matters. The prettiest property can become the most awkward airspace if it’s boxed in by tall pines, bordered by a ravine, or exposed to gusts funneled through a valley. A drone with strong sensing gives you a better margin, particularly during diagonal and reverse movements, but the shot plan still needs to respect the terrain.
Use ActiveTrack for venue storytelling, not just moving subjects
A lot of pilots hear “subject tracking” and immediately think sports, bikes, or running shots. For venue work, I use ActiveTrack differently.
The most useful tracked subject at a remote venue is often a vehicle or a person walking the approach path. Why? Because movement explains scale faster than any static overhead.
If the property is genuinely remote, the journey in matters. A tracked SUV approaching the lodge, a couple walking toward a ridge ceremony point, or staff crossing from the main building to an outdoor reception area can reveal distance, grade, and flow in a way a locked-off aerial never will.
This is where ActiveTrack has real operational significance. It helps maintain framing while I focus on route safety and surrounding airspace, which is particularly helpful when the terrain is irregular. Instead of manually trying to keep a tiny moving subject centered while also monitoring trees and wind drift, I can let the tracking system handle part of the framing burden. That frees attention for the piloting decisions that matter more.
I still keep these shots conservative. Remote venues are exactly where a dramatic low tracking run can go wrong. Dust, branches, uneven ground effect, and sudden wind shear near structures can turn a stylish pass into a recovery exercise. If I’m tracking a vehicle or subject, I prefer a slightly higher angle than I would in an open field. Clean and safe beats aggressive and disposable.
D-Log is useful here for a very specific reason
People often talk about D-Log as if it’s automatically “more professional.” That’s too broad to be helpful.
For remote venue work, D-Log matters because these locations often force extreme contrast into the same frame. You may be shooting a bright sky, pale gravel roads, dark tree cover, reflective water, and a shaded building facade all at once. Standard profiles can look punchy in the moment but clip highlights or crush shadow detail you later wish you had preserved.
D-Log gives you more room to hold that range and shape the image later so the venue looks believable rather than overcooked. This becomes especially valuable when you’re filming around sunrise or late afternoon, which is often the best time for remote properties. You get directional light and texture, but also a lot of contrast between lit and shaded areas.
Operationally, that means I can prioritize the flight path and timing while trusting that the footage has enough grading latitude to match a broader photo or video set in post. If the final deliverables include both cinematic clips and practical marketing visuals, that flexibility helps maintain continuity across outputs.
The caution is simple: if you do not have a post workflow for D-Log, don’t use it just to feel advanced. Remote shoots already come with enough variables. Choose the profile you can finish well.
Hyperlapse only works if the venue has spatial logic
Hyperlapse can be excellent for remote venue storytelling, but only when the geography reads clearly.
A moving time-lapse over a random patch of scenic land doesn’t tell the viewer much. A Hyperlapse that reveals how morning fog lifts off a valley around the venue, or how the reception space sits beneath a ridgeline while clouds move behind it, can be powerful. It adds temporal context. It shows atmosphere, not just architecture.
The Mavic 4 Pro’s Hyperlapse modes are most useful when I’ve already identified a stable composition with a strong anchor: the main building, a ceremony platform, a dock, a cliffside deck. The movement in the landscape should support that subject, not compete with it.
For remote venues, I usually avoid overcomplicated Hyperlapse paths. Simpler motion tends to survive better in wind and preserve the venue as the visual center. If the weather is shifting quickly, I would rather capture a shorter, clean sequence than waste a battery trying to force a longer move that won’t cut well with the rest of the edit.
Obstacle avoidance changes what shots are practical near tree-heavy properties
This is one of the most underappreciated advantages for venue coverage. Remote sites are often visually defined by what surrounds them: cedar groves, canyon walls, hedgerows, rock formations. The challenge is that those same features make conventional drone movements harder to execute safely.
A modern obstacle avoidance system expands the kind of medium-altitude moves that are realistic. Not reckless moves. Realistic ones.
For example, one of my favorite venue shots is a side-slip reveal where the foreground trees initially obscure part of the property, then the building opens into view as the drone slides laterally. On a tree-dense site, that shot can be uncomfortable without strong sensing because branch depth is harder to judge from a single screen perspective. With better obstacle awareness, I can build that reveal with more confidence and a better safety buffer.
That doesn’t mean you fly blindly into canopies because the aircraft has sensors. It means the aircraft supports a more deliberate approach to shots that would otherwise be too risky to repeat under time pressure.
This is also where remote delivery matters from a content perspective. A venue in a remote area often wants to feel secluded, but not inaccessible. Sliding reveals through natural framing help communicate exactly that balance. The property appears protected by the landscape, yet still functional and welcoming.
Shot list for a remote venue that actually converts interest
If I only had one battery cycle to prove a remote venue’s value, I would prioritize this sequence:
- A 40 to 60 meter establishing orbit
- An approach shot along the primary access road
- A top-down or high oblique showing parking and arrival flow
- A medium pullback from the ceremony or event focal point
- A lateral reveal through trees or terrain
- A tracked movement with a car or walking couple using ActiveTrack
- One high hero shot that places the venue in its wider landscape
- One restrained Hyperlapse if weather and light justify it
That sequence answers both emotional and practical questions. The viewer sees beauty, but also circulation, context, and usability.
QuickShots can help produce one or two of these efficiently, especially orbits and reveals, but I would still treat them as support tools. The strongest venue coverage usually comes from matching the shot to the property rather than forcing the property into a canned move.
Wind, signal, and battery discipline matter more in remote jobs
This is the part people skip because it sounds less glamorous. It is also the part that protects the assignment.
Remote venues often mean fewer clean launch zones, less predictable signal conditions, and more pressure to “just get one more shot” while you’re far from a charger or vehicle. The Mavic 4 Pro can give you impressive capability, but remote work rewards restraint.
I decide the return threshold before takeoff. I identify a backup landing area before moving away from the launch point. I avoid chasing low shots into uncertain wind corridors near tree lines or ridges. I capture the must-have establishing sequence first, before experimenting.
If I’m working with a venue team and want to coordinate moving subjects for an ActiveTrack pass or timed arrival shot, I keep communication simple. One vehicle, one route, one rehearsal if possible. If you need help coordinating a remote venue shoot plan, this is the point where a quick production message can save a lot of field confusion: send the route and timing here.
The best altitude is the one that explains the place
If you remember one thing for remote venue coverage with the Mavic 4 Pro, make it this: altitude is not about height for its own sake. It is about explanation.
For most remote venues, the most useful footage does not come from the highest legal climb. It comes from the band where layout, access, terrain, and atmosphere all make sense together. In practice, that usually means living around 40 to 60 meters for the backbone of the shoot, then dropping lower for approach emotion and climbing higher only when the geography truly adds value.
That approach also plays to the aircraft’s strengths. Obstacle avoidance supports safer medium-altitude movement around trees and terrain. ActiveTrack helps turn simple human or vehicle motion into scale cues. QuickShots can accelerate repeatable moves when time is short. Hyperlapse adds environmental atmosphere when the site has strong spatial structure. D-Log protects image flexibility when remote landscapes throw bright skies and deep shadows into the same frame.
The result is not just nicer footage. It is footage that helps people understand a place they may never have visited.
That is what remote venue work demands. Not generic aerial beauty. Useful beauty.
Ready for your own Mavic 4 Pro? Contact our team for expert consultation.