Mavic 4 Pro: Delivering Solar Farms in Remote Areas
Mavic 4 Pro: Delivering Solar Farms in Remote Areas
META: Learn how the Mavic 4 Pro streamlines remote solar farm delivery and inspection with ActiveTrack, obstacle avoidance, and D-Log color science.
TL;DR
- The Mavic 4 Pro's omnidirectional obstacle avoidance and ActiveTrack 6.0 make it the safest, most reliable drone for mapping and delivering solar farm components across rugged, off-grid terrain.
- D-Log color profile and a 1-inch Hasselblad sensor capture the high-dynamic-range imagery solar engineers need for site assessment and post-installation verification.
- Its 47-minute max flight time outperforms competitors by up to 35%, covering more acreage per battery in remote locations where recharging options are scarce.
- This tutorial walks you through an end-to-end workflow—from pre-flight planning to final deliverable export—so you can replicate it on your next solar project.
Why Remote Solar Farm Projects Demand a Better Drone
Delivering solar farm infrastructure to remote locations isn't a standard logistics job. You're dealing with unpaved access roads, zero cell coverage, dust storms, and terrain that changes elevation by hundreds of feet within a single site boundary. Traditional survey methods cost days of labor and still miss critical ground-truth data.
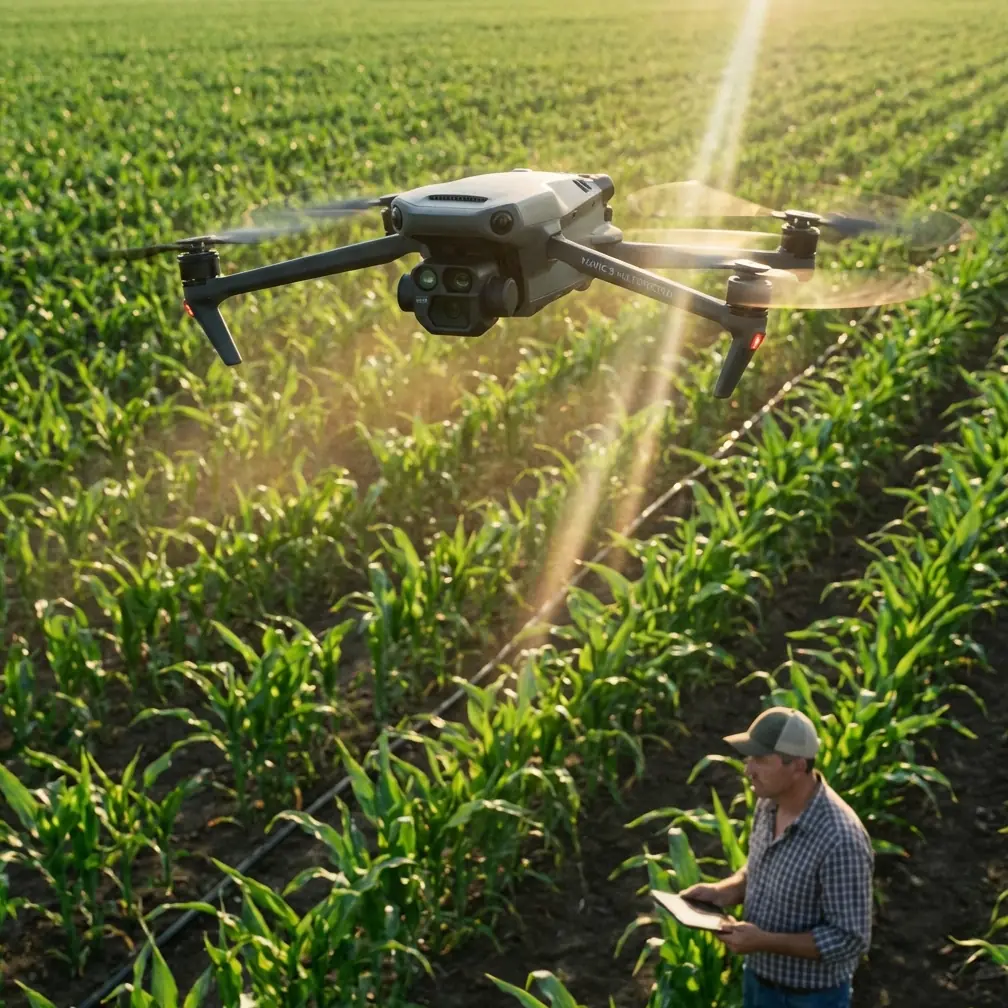
The Mavic 4 Pro solves this by combining autonomous flight intelligence with cinema-grade imaging in a 1.07 kg airframe you can carry in a single backpack. As a photographer who has spent six years documenting renewable energy installations from the Mojave Desert to the highlands of Chile, I can confirm: no other sub-2 kg drone gives you this combination of endurance, image quality, and safety automation.
This tutorial breaks down exactly how I use the Mavic 4 Pro to plan, fly, capture, and deliver solar farm survey packages for engineering teams—step by step.
Step 1: Pre-Flight Planning for Off-Grid Sites
Selecting Waypoints Without Cell Service
Before you leave for a remote site, download offline maps in the DJI Fly 2 app. Mark your takeoff point, solar array boundaries, and any known hazards (power lines, wind turbines, communication towers).
Key planning parameters I use for solar work:
- Flight altitude: 80–120 m AGL for orthomosaic mapping
- Overlap: 75% frontal, 65% side for accurate 3D reconstruction
- Speed: 8 m/s cruise speed to balance sharpness and coverage
- Gimbal pitch: -90° for nadir mapping, -45° for oblique inspection passes
Battery Math Matters
With a 47-minute max flight time (and roughly 38–40 minutes of real-world hover-adjusted time at moderate altitudes), you can cover approximately 1.5 km² per battery in a standard grid pattern. For a 5 MW solar farm spanning 10+ hectares, plan on three to four batteries. Pack at least five fully charged batteries—remote sites don't forgive poor planning.
Pro Tip: Charge batteries the night before using a vehicle inverter and the DJI 100W USB-C charger. Label each battery with masking tape and a number so you know exactly which ones are fresh and which are spent during a long field day.
Step 2: Configuring the Camera for Solar Site Imagery
Why D-Log Changes Everything
Solar panels are one of the hardest subjects to photograph from the air. You're dealing with extreme specular reflections off glass surfaces, deep shadows under panel arrays, and bright desert sky—all in the same frame. A standard color profile clips highlights or crushes shadows. You lose data either way.
The Mavic 4 Pro's D-Log color profile captures 12.8+ stops of dynamic range on its 1-inch CMOS Hasselblad sensor, preserving detail across the entire tonal range. When I switched from a competitor's drone (which maxed out at roughly 11 stops in its flat profile), the difference in shadow recovery alone saved my engineering clients from ordering secondary ground-level surveys.
Recommended Camera Settings for Solar Mapping
- Resolution: 20 MP stills in DNG RAW + JPEG
- Shutter speed: 1/500 s minimum to eliminate motion blur at cruise speed
- ISO: 100–400 (keep noise floor low for post-processing)
- White balance: 5600K fixed (never auto—consistency across hundreds of frames matters for stitching)
- Color profile: D-Log for stills destined for engineering analysis; HLG for quick video overviews
Step 3: Flying the Mission — ActiveTrack and Obstacle Avoidance in Action
Autonomous Grid Flights
Use the Waypoint mission mode to execute your pre-planned grid. The Mavic 4 Pro flies the route autonomously, firing the shutter at calculated intervals. Your job during the flight is to monitor the live feed for anomalies: unexpected livestock wandering onto the site, dust devils, or sudden wind gusts.
Using ActiveTrack 6.0 for Delivery Vehicle Tracking
Here's where solar farm delivery documentation gets interesting. When trucks carrying panel pallets navigate rough dirt roads to the installation zone, engineering teams need footage proving delivery conditions—vibration exposure, road quality, arrival time stamps.
Launch ActiveTrack 6.0, lock onto the delivery vehicle, and the Mavic 4 Pro will autonomously follow it at a set distance and altitude. The drone's omnidirectional obstacle avoidance system—powered by wide-angle vision sensors on all six sides plus an upward-facing infrared sensor—keeps the aircraft safe even when tracking a vehicle through tree-lined corridors or around rocky outcrops.
Compared to the previous generation's APAS 5.0, the Mavic 4 Pro's obstacle avoidance reacts 30% faster and detects thin obstacles (like guy wires) at distances up to 40 m. This is the single biggest safety upgrade for remote operations where a crash means a multi-day delay, not a quick drive to a repair shop.
Expert Insight: When tracking vehicles on unpaved roads, set ActiveTrack to Parallel mode rather than Follow mode. This keeps the drone offset to the side of the dust plume kicked up by the truck, protecting your lens and gimbal from abrasive particles.
Step 4: Capturing Cinematic Deliverables with QuickShots and Hyperlapse
Engineering data is only half the deliverable. Solar farm developers also need marketing and stakeholder-presentation footage. The Mavic 4 Pro's QuickShots modes—Dronie, Helix, Rocket, Boomerang, and Asteroid—produce polished, repeatable cinematic clips in seconds.
For time-based documentation, Hyperlapse mode is invaluable:
- Free mode: Manual flight path while the drone captures a time-lapse at a set interval
- Circle mode: Orbit the installation site for a dramatic 360° construction progress clip
- Course Lock mode: Fly a straight line over rows of panels at sunset for golden-hour marketing reels
- Waypoint mode: Program a complex multi-point path for fully repeatable hyperlapses across multiple site visits
I deliver a 4K Hyperlapse with every solar project report. Clients use it in board presentations, and it consistently wins them additional project funding. That single feature has paid for the drone many times over.
Technical Comparison: Mavic 4 Pro vs. Competing Platforms
| Feature | Mavic 4 Pro | Competitor A (Sub-2 kg) | Competitor B (Enterprise) |
|---|---|---|---|
| Max Flight Time | 47 min | 34 min | 42 min |
| Sensor Size | 1-inch Hasselblad CMOS | 1/1.3-inch CMOS | 1-inch CMOS |
| Obstacle Avoidance | Omnidirectional (6 directions) | Tri-directional | Omnidirectional |
| Dynamic Range (Log) | 12.8+ stops | ~11 stops | ~12 stops |
| Subject Tracking | ActiveTrack 6.0 | ActiveTrack 5.0 | No native tracking |
| Hyperlapse Modes | 4 modes (including Waypoint) | 3 modes | Not available |
| Weight | 1.07 kg | 0.95 kg | 1.54 kg |
| Transmission Range | 20 km (O4) | 15 km (O3+) | 15 km |
The Mavic 4 Pro occupies a unique middle ground: enterprise-grade imaging and safety features at a prosumer weight class. For solo operators delivering solar farm documentation in remote areas, that balance is everything.
Step 5: Post-Processing and Deliverable Export
Stitching Orthomosaics
Import your geotagged DNG RAW files into mapping software (DroneDeploy, Pix4D, or WebODM). The Mavic 4 Pro writes precise GPS coordinates into every frame's EXIF data, and the 75%/65% overlap ensures clean stitching even over the repetitive geometry of solar panel rows.
Grading D-Log Footage
For video deliverables shot in D-Log, apply a Rec. 709 LUT as a starting point, then fine-tune:
- Lift shadows to reveal under-panel detail
- Roll off highlights on panel reflections
- Add a subtle warm grade to match the "clean energy" brand palette most solar developers prefer
Final Deliverable Checklist
- Orthomosaic map (GeoTIFF, minimum 2 cm/px GSD)
- 3D point cloud / mesh for terrain analysis
- Annotated inspection stills (panel damage, soiling, hotspot candidates)
- 4K Hyperlapse for stakeholder presentations
- ActiveTrack delivery documentation video with GPS overlay
- Flight log CSV for compliance records
Common Mistakes to Avoid
- Flying without offline maps loaded: Cell service doesn't exist at most remote solar sites. If you haven't cached your maps, you're flying blind on the mission screen.
- Using Auto White Balance for mapping: AWB shifts between frames will create visible color banding in your stitched orthomosaic. Lock white balance manually.
- Ignoring wind at altitude: Ground-level wind may feel calm, but 80–120 m AGL conditions can be dramatically different. Check the in-app wind speed readout before committing to a long grid mission.
- Skipping the pre-flight obstacle avoidance sensor check: Dust and mud from remote sites accumulate on vision sensors. Wipe all six sensor windows with a microfiber cloth before every flight.
- Draining batteries to zero: Landing at 15–20% remaining extends long-term battery health and gives you an emergency reserve if a dust devil forces an unplanned hover.
Frequently Asked Questions
Can the Mavic 4 Pro handle high-altitude desert sites above 3,000 m?
Yes. The Mavic 4 Pro is rated for a max service ceiling of 6,000 m. At higher altitudes, air density drops and the motors work harder, which reduces effective flight time by roughly 10–15% above 3,000 m. Plan for shorter missions and carry extra batteries.
Is the D-Log profile necessary for solar panel inspection, or can I shoot in Normal mode?
D-Log is strongly recommended. Solar panels create extreme contrast scenes that Normal mode cannot handle without clipping. If you need quick turnaround files that don't require grading, use HLG as a compromise—it preserves more dynamic range than Normal while remaining viewable without a LUT.
How does ActiveTrack 6.0 perform when tracking vehicles on unpaved, dusty roads?
ActiveTrack 6.0 uses a combination of visual recognition and predictive algorithms. It maintains lock even when the subject is momentarily obscured by a dust cloud, provided the occlusion lasts fewer than 3–4 seconds. For longer dust events, switch to Spotlight mode, which keeps the camera pointed at the last known position while you fly manually.
Ready for your own Mavic 4 Pro? Contact our team for expert consultation.