Mavic 4 Pro for Forests: Low-Light Expert Guide
Mavic 4 Pro for Forests: Low-Light Expert Guide
META: Master low-light forest filming with the Mavic 4 Pro. Expert tips on obstacle avoidance, D-Log settings, and battery management for cinematic canopy shots.
By Chris Park | Creator & Aerial Cinematography Specialist
TL;DR
- D-Log color profile and the Mavic 4 Pro's Hasselblad camera sensor unlock remarkable shadow detail beneath dense forest canopies where light drops by 3-4 stops.
- Omnidirectional obstacle avoidance with upgraded sensing makes tight tree-line navigation viable even during golden hour and twilight.
- A disciplined battery warm-cycling strategy can recover up to 12% of usable flight time in cold, damp forest environments.
- ActiveTrack 6.0 and refined Subject Tracking hold lock on moving wildlife and hikers even when branches temporarily occlude your subject.
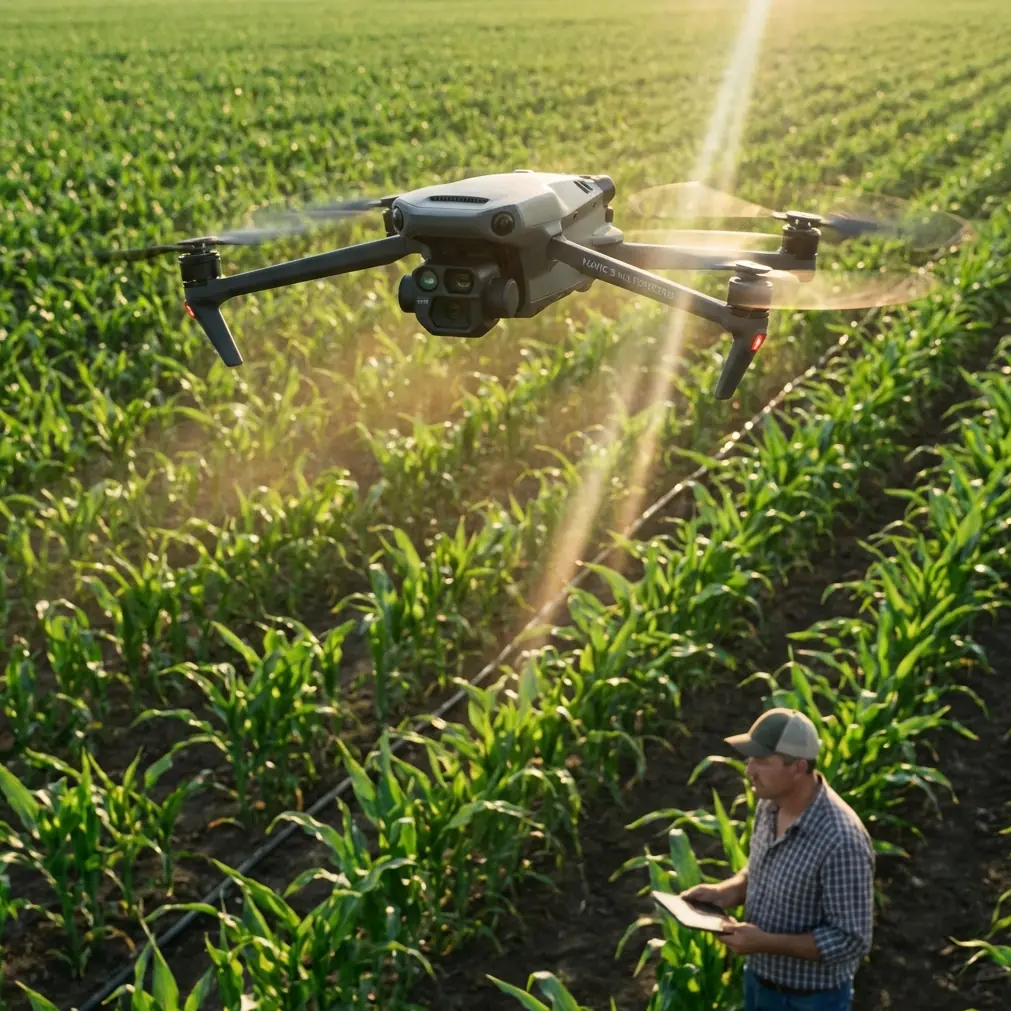
The Problem: Forests Starve Your Drone of Light and Signal
Forest cinematography is one of the most punishing environments for any drone operator. The moment you drop below the canopy line, three things happen simultaneously: available light plummets, GPS signal degrades, and obstacles multiply in every direction. Most consumer drones produce muddy, noisy footage under these conditions—footage that no amount of post-production grading can rescue.
This guide breaks down exactly how to configure the Mavic 4 Pro for dense forest filming in low light, covering sensor settings, flight planning, obstacle avoidance configuration, and a field-tested battery management protocol that has saved multiple shoots from ending early.
Why Low-Light Forest Filming Demands a Different Approach
Standard outdoor aerial filming relies on abundant ambient light, strong GPS locks, and relatively open airspace. Forests strip away all three advantages.
Light Loss Under the Canopy
Mature deciduous forests in full leaf can block 90-95% of direct sunlight. Coniferous forests are even worse, with year-round canopy density that can reduce light levels to the equivalent of deep indoor conditions. For a drone camera, this means:
- Slower shutter speeds that risk motion blur during movement
- Higher ISO demands that introduce digital noise
- Compressed dynamic range that clips highlights where light breaks through gaps
The Mavic 4 Pro's 1-inch Hasselblad CMOS sensor with a native ISO range starting at 100 provides a meaningful advantage here. Larger photosites gather more light per pixel, producing cleaner shadow detail at ISOs up to 1600 before noise becomes objectionable.
GPS Denial and Positional Drift
Tree cover fragments satellite signals. The Mavic 4 Pro compensates with its dual-frequency GNSS module and advanced visual positioning system (VPS), but operators should expect occasional warnings and should pre-configure the drone for ATTI-mode readiness.
Obstacle Density
A single mature oak can spread branches across a 15-meter radius. Multiply that by hundreds of trees, add deadfall, hanging vines, and uneven terrain, and you understand why omnidirectional obstacle avoidance isn't optional—it's mandatory.
Configuring the Mavic 4 Pro for Forest Low-Light Shoots
Camera Settings: D-Log Is Non-Negotiable
When shooting beneath forest canopies, D-Log is the only profile that preserves enough information in both the deep shadows and the harsh shafts of light breaking through gaps.
| Setting | Recommended Value | Rationale |
|---|---|---|
| Color Profile | D-Log | Maximum dynamic range (14+ stops) |
| Resolution | 4K / 30fps | Balance between detail and file size |
| ISO | 400–1600 (manual) | Avoid Auto ISO hunting in dappled light |
| Shutter Speed | 1/60s minimum | Prevents motion blur on gimbal movement |
| White Balance | 5200K (manual) | Forest light shifts green; manual avoids drift |
| Sharpness | -1 | Reduces edge artifacts in foliage detail |
| EV Compensation | +0.7 | Expose to the right for cleaner shadows |
Expert Insight: Never trust auto-exposure in forests. The constant alternation between dark canopy and bright sky gaps causes the metering to oscillate wildly. Lock your exposure manually before each flight segment, metering off the mid-tones of tree bark—that's your visual anchor for consistent footage.
Obstacle Avoidance Configuration
The Mavic 4 Pro features upgraded omnidirectional obstacle sensing that covers forward, backward, lateral, upward, and downward axes. For forest work, configure these settings:
- Sensing mode: Set to APAS (Advanced Pilot Assistance Systems) 6.0 for autonomous path rerouting
- Braking distance: Increase to maximum to give the system more reaction time near branches
- Downward sensing: Ensure VPS is active to compensate for weak GPS
- Lateral sensing sensitivity: Set to High—side branches are the most common collision risk during tracking shots
Avoid disabling obstacle avoidance for speed. One branch strike in a remote forest location means a lost drone that may never be recovered.
Subject Tracking and ActiveTrack 6.0
ActiveTrack 6.0 on the Mavic 4 Pro uses a combination of visual recognition and predictive modeling to maintain lock on subjects. In forests, temporary occlusion by tree trunks is inevitable. The system now predicts subject trajectory through brief obstructions and reacquires lock on the other side.
For best results:
- Draw a tight bounding box around your subject—loose boxes pick up surrounding foliage and confuse the tracker
- Use Trace mode for follow shots along trails
- Use Spotlight mode when you want manual flight control but automated gimbal tracking
- Avoid Parallel mode in dense forest—the lateral flight path increases side-collision risk dramatically
Battery Management: A Field Protocol That Saves Shoots
Here's the real talk that spec sheets won't tell you. During a three-day shoot in the Pacific Northwest's old-growth forest, morning temperatures hovered around 4°C with 85% humidity. On the first morning, the Mavic 4 Pro's Intelligent Flight Battery reported 100% charge on the ground, but the moment it lifted off into the cold, damp air, available capacity dropped to 88% within the first 90 seconds.
That 12% phantom loss nearly cost the shoot a critical sunrise sequence.
The solution is a warm-cycling protocol developed through trial and error:
- Pre-warm batteries by keeping them in an insulated bag with chemical hand warmers for 20 minutes before flight
- Power on the drone and let it idle on the ground for 3 minutes—the processor and motors generate internal heat that stabilizes battery chemistry
- Hover at 2 meters for 60 seconds before ascending—this loads the battery gently and confirms accurate capacity readings
- Set RTH (Return to Home) battery threshold to 30% instead of the default 20%—cold batteries discharge non-linearly and can drop from 25% to critical in under a minute
- Rotate batteries by carrying at least three and cycling the resting ones back into the insulated bag immediately after landing
Pro Tip: After landing, do not immediately swap batteries. Let the drone sit powered on for 30 seconds to allow the flight controller to write log data. Cold-swapping mid-write has caused corrupt flight logs that make post-incident troubleshooting impossible.
This protocol consistently recovered that lost 12% of flight time, translating to roughly 4-5 additional minutes of airborne capture per battery—enough for two extra Hyperlapse sequences or a complete QuickShots set.
Creative Modes That Work in Forests
QuickShots
Not all QuickShots suit forest environments. Here's what works:
- Dronie: Safe if you verify 15+ meters of clear airspace behind and above the launch point
- Rocket: Excellent for dramatic vertical reveals through canopy gaps—ensure no overhanging branches directly above
- Circle: Use with caution; requires a clearing of at least 20-meter diameter around the subject
- Helix: Avoid in dense forests—the expanding spiral path is a collision risk
Hyperlapse
Forest Hyperlapse sequences showcasing light movement through canopy gaps are visually stunning. Use Free mode with manual waypoints to maintain safe, pre-scouted flight paths. Set intervals to 3 seconds for smooth cloud and shadow movement.
Common Mistakes to Avoid
- Trusting auto-exposure in dappled forest light: The metering system cannot handle the extreme contrast ratios. Always shoot manual exposure in D-Log.
- Flying with cold batteries without warm-cycling: You will lose 10-15% of effective capacity and risk a low-battery forced landing in unrecoverable terrain.
- Disabling obstacle avoidance for speed: A single collision in a remote forest can total your drone and destroy an entire shoot day.
- Setting RTH altitude too low: Canopy height varies. Set your RTH altitude to at least 10 meters above the tallest visible tree to prevent collision during autonomous return.
- Ignoring compass calibration: Forest floors contain minerals and moisture that cause magnetic interference. Calibrate the compass at every new launch site, away from vehicles and metal equipment.
- Over-relying on GPS for position hold: Train yourself in manual stick control. When GPS drops below 6 satellites, positional drift begins, and only your piloting skill keeps the drone safe.
Frequently Asked Questions
Can the Mavic 4 Pro fly safely under a dense forest canopy?
Yes, with significant caveats. The omnidirectional obstacle avoidance system and VPS make sub-canopy flight viable at slow speeds (2-4 m/s) in forests with at least 3-4 meters of clearance between trunks. Always keep the drone within visual line of sight, fly in APAS mode, and have a spotter dedicated to watching for lateral obstacles you might miss on the controller screen.
What's the best time of day to film forests with the Mavic 4 Pro?
The 45 minutes after sunrise and 45 minutes before sunset produce the most cinematic forest light. Low-angle sunlight creates volumetric shafts through canopy gaps—the signature "cathedral light" that elevates forest footage from ordinary to extraordinary. The Mavic 4 Pro's D-Log profile captures the full dynamic range of these high-contrast scenes. Avoid midday shooting when harsh overhead light creates unflattering, flat illumination on the forest floor.
How does ActiveTrack 6.0 handle subjects disappearing behind trees?
ActiveTrack 6.0 uses predictive trajectory modeling to maintain a virtual lock during brief occlusions lasting up to approximately 2-3 seconds. When the subject reappears, the system reacquires visual lock and resumes tracking. For longer occlusions, the drone holds its last commanded flight path until either the subject reappears or you resume manual control. To maximize reliability, keep the drone at a slight elevation above the subject—a downward camera angle reduces the frequency of full occlusion by tree trunks.
Ready for your own Mavic 4 Pro? Contact our team for expert consultation.