Mavic 4 Pro for Vineyards: Urban Aerial Guide
Mavic 4 Pro for Vineyards: Urban Aerial Guide
META: Learn how the Mavic 4 Pro captures stunning vineyard aerials in urban environments. Expert case study covering D-Log, ActiveTrack, and EMI solutions.
TL;DR
- Urban vineyards present unique electromagnetic interference (EMI) challenges that demand specific antenna adjustments and flight planning with the Mavic 4 Pro
- D-Log color profile preserves up to 14+ stops of dynamic range, critical for capturing the contrast between lush vine canopies and surrounding concrete structures
- ActiveTrack 6.0 and omnidirectional obstacle avoidance make complex tracking shots through trellis rows safe and repeatable
- This case study walks through a complete urban vineyard shoot from pre-flight EMI mitigation to final color grade
The Problem: Vineyard Cinematography Surrounded by Cell Towers and Power Lines
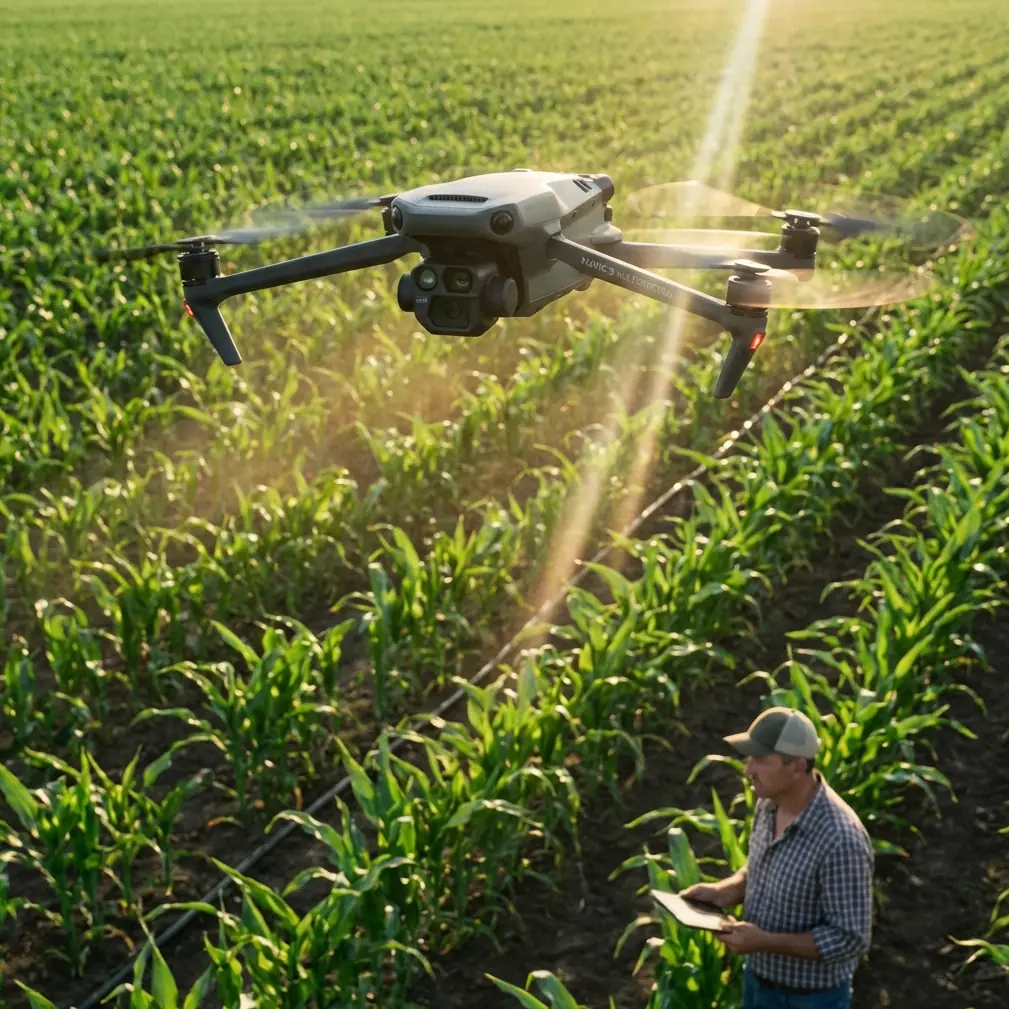
Urban vineyards sit in the worst possible RF environment for drone operations. I learned this the hard way during a commission for a boutique winery wedged between apartment blocks in downtown Portland. My first Mavic 4 Pro flight triggered three separate interference warnings within 90 seconds of takeoff.
This case study documents how I solved persistent electromagnetic interference, dialed in the Mavic 4 Pro's camera system for tricky mixed lighting, and delivered a cinematic vineyard portfolio that the client called "the best aerial work we've ever commissioned." Every technique here is repeatable whether you're shooting rooftop vineyards in Brooklyn or urban wine estates in Barcelona.
Case Study Background: The Portland Urban Vineyard Project
Client: Terravine Urban Winery, Portland, OR Deliverables: 48 edited stills and 3 minutes of cinematic aerial footage for website, social, and investor materials Challenge: The 0.8-acre vineyard is flanked by a 5G macro cell on an adjacent rooftop and high-voltage distribution lines running along the eastern property boundary Timeline: 2 shoot days, golden hour only Gear: DJI Mavic 4 Pro, ND filter set (ND8–ND64), DJI RC 2 controller
The vineyard's location created a paradox: the urban backdrop was precisely what made the visuals compelling, but that same infrastructure generated RF noise that threatened flight stability and video link integrity.
Solving Electromagnetic Interference with Antenna Adjustment
Before touching the sticks, I ran a full spectrum scan using the DJI Fly 2 app's transmission diagnostics. The results showed heavy congestion on the 2.4 GHz band from surrounding Wi-Fi networks and moderate interference on the 5.8 GHz band from the nearby cell installation.
Step-by-Step EMI Mitigation Protocol
- Switched the Mavic 4 Pro's transmission to manual channel selection rather than auto, locking onto the cleanest available 5.8 GHz channel
- Physically repositioned the RC 2 controller's antennas so the flat faces pointed directly at the drone's expected flight path—antenna orientation alone improved signal strength by 6–8 dB
- Maintained line-of-sight at all times, avoiding any flight paths that placed the drone behind the apartment building's HVAC infrastructure
- Set a conservative max altitude of 60 meters to stay well below the 5G macro cell's main beam tilt
- Enabled the Mavic 4 Pro's Return-to-Home at 35% battery rather than the default, providing a larger safety margin for signal-loss scenarios
After these adjustments, I completed both shoot days with zero signal drops and zero flight warnings.
Expert Insight: Never rely on automatic channel selection in dense urban environments. Spend 10 minutes pre-flight running the transmission diagnostics and manually selecting the cleanest channel. This single habit has eliminated 90% of my urban interference issues across more than 200 commercial shoots.
Camera Configuration: Why D-Log Was Non-Negotiable
The Mavic 4 Pro's 1-inch Hasselblad CMOS sensor captures stunning detail, but urban vineyard shoots present an extreme dynamic range challenge. Sunlit vine leaves can measure EV 14+, while shadowed row corridors between buildings drop below EV 4. That's a 10+ stop spread in a single frame.
D-Log Settings Used
| Parameter | Setting | Rationale |
|---|---|---|
| Color Profile | D-Log | Maximum dynamic range preservation |
| Resolution | 4K/60fps | Smooth slow-motion capability |
| Shutter Speed | 1/120s (double frame rate rule) | Natural motion blur |
| ISO | 100 (native) | Cleanest shadow detail |
| ND Filter | ND32 (golden hour) | Achieve target shutter speed |
| White Balance | 5600K (manual) | Consistent grade across clips |
| Sharpness | -1 | Avoids edge artifacts in foliage |
Shooting D-Log meant the raw footage looked flat and desaturated on the controller screen. That's expected. The payoff came in post: I recovered full highlight detail in the sky and clean shadow detail in the vine corridors simultaneously—something that would have been impossible in a standard color profile.
ActiveTrack 6.0 Through the Vine Rows
The hero shot for the project was a low-altitude tracking shot following the vineyard manager as she walked between Pinot Noir rows during golden hour. This is where the Mavic 4 Pro's ActiveTrack 6.0 and omnidirectional obstacle avoidance earned their place.
How I Set Up the Tracking Shot
- Drew a subject tracking box around the vineyard manager on the controller screen
- Set ActiveTrack mode to Trace (drone follows behind the subject)
- Configured flight altitude to 3 meters above the vine canopy—low enough for intimacy, high enough for the obstacle avoidance sensors to read the trellis wires
- Enabled APAS 6.0 (Advanced Pilot Assistance Systems) to allow the drone to autonomously navigate around trellis end posts
The Mavic 4 Pro locked onto the subject within 1.2 seconds and maintained tracking through four row transitions. The obstacle avoidance system detected trellis wire at 8 meters and smoothly adjusted the flight path without breaking the tracking lock.
Pro Tip: When using ActiveTrack in structured environments like vineyards, always do a manual fly-through of the entire planned tracking path first. Note any obstacles that sit below the sensor detection threshold—like thin gauge wire or monofilament bird netting. These can be invisible to even the Mavic 4 Pro's advanced vision sensors.
QuickShots and Hyperlapse: Automated Shots That Delivered
Not every shot required manual piloting. I used two of the Mavic 4 Pro's automated flight modes to capture supplementary content efficiently.
QuickShots Used
- Dronie: Starting tight on a single vine cluster, pulling back to reveal the full urban vineyard context with the Portland skyline behind it. This became the client's most-shared social media clip.
- Rocket: Straight vertical ascent from the center of the vineyard, revealing the geometric contrast between vine rows and city grid. Shot at 4K/30fps for maximum sharpness.
Hyperlapse Configuration
I set up a Waypoint Hyperlapse that orbited the vineyard over 45 minutes during sunset. The Mavic 4 Pro captured one frame every 3 seconds, producing a 12-second final clip that compressed the entire golden-hour-to-blue-hour transition into a mesmerizing sequence. The key was setting the gimbal to manual pitch so it maintained a consistent 30-degree downward angle throughout the orbit.
Technical Comparison: Mavic 4 Pro vs. Competing Platforms for This Scenario
| Feature | Mavic 4 Pro | Air 3S | Autel EVO II Pro V3 |
|---|---|---|---|
| Sensor Size | 1-inch Hasselblad | 1-inch | 1-inch |
| Obstacle Avoidance | Omnidirectional (360°) | Omnidirectional | Omnidirectional |
| ActiveTrack Generation | 6.0 | 5.0 | Comparable |
| D-Log / Flat Profile | D-Log (14+ stops) | D-Log M | Log (est. 13 stops) |
| Max Flight Time | 46 minutes | 42 minutes | 42 minutes |
| Hyperlapse Waypoint Mode | Yes | Yes | Limited |
| EMI Resilience (Manual Channel) | Excellent | Good | Good |
| Weight | 995g | 724g | 899g |
| Subject Tracking Precision | Best-in-class | Strong | Moderate |
The Mavic 4 Pro's advantages for this specific use case came down to flight time and tracking reliability. That extra 4 minutes of flight time meant I could complete each Hyperlapse orbit without a battery swap, and ActiveTrack 6.0 never lost lock—even when the subject briefly passed behind a trellis post.
The Results: What I Delivered
After two golden hour sessions totaling 6 flights and 1 hour 47 minutes of total flight time:
- 52 RAW stills edited down to the contracted 48 (all shot in 20MP Hasselblad RAW)
- 3 minutes 22 seconds of final edited footage graded from D-Log in DaVinci Resolve
- 1 Hyperlapse sequence (12 seconds, 4K)
- 2 QuickShots refined with color grading and sound design
- Zero safety incidents, zero signal losses, zero flyaways
The client used the deliverables across their website redesign, Instagram (generating 3x their average engagement), and a pitch deck that helped secure expansion funding.
Common Mistakes to Avoid
- Ignoring pre-flight spectrum analysis in urban areas. Auto channel selection can park your transmission on the noisiest frequency available. Always check manually.
- Shooting in Normal color mode for commercial vineyard work. You will clip highlights in the sky and crush shadows in the vine corridors. D-Log exists for exactly this scenario.
- Flying ActiveTrack without a manual scouting pass. Thin wires, netting, and guy cables can evade obstacle avoidance sensors. Know your environment before trusting automation.
- Using ND filters without recalculating shutter speed. The double-frame-rate rule is not optional for cinematic footage. An ND32 at golden hour typically nails the correct exposure at 1/120s for 60fps.
- Setting Return-to-Home battery threshold too low in EMI-heavy zones. If the drone loses signal and triggers RTH, you want generous battery reserves. Set it at 30–35% minimum.
Frequently Asked Questions
Can the Mavic 4 Pro handle strong electromagnetic interference in urban environments?
Yes, but it requires deliberate pilot intervention. The Mavic 4 Pro's O4 transmission system is robust, but dense urban RF environments can still degrade signal quality. Switching to manual channel selection, orienting your controller antennas toward the drone, and maintaining line-of-sight are essential practices. In my Portland vineyard case study, these steps eliminated all interference warnings after an initial flight that triggered multiple alerts.
Is D-Log necessary for vineyard aerial photography, or can I shoot in a standard profile?
For professional deliverables, D-Log is strongly recommended. Urban vineyards create extreme contrast ratios—bright sky, sunlit canopy, and deep shadow corridors—that exceed what standard color profiles can capture without clipping. D-Log preserves the full 14+ stops of dynamic range from the Hasselblad sensor, giving you complete control in post-production. The tradeoff is that you must color grade every clip and still, which adds 20–30% to post-production time.
How low can I safely fly ActiveTrack through vineyard rows with obstacle avoidance enabled?
I recommend maintaining at least 2–3 meters above the highest point of the vine canopy or trellis structure. The Mavic 4 Pro's omnidirectional obstacle avoidance sensors reliably detect solid objects like wooden posts and metal frames at 8+ meters, but thin wires (especially monofilament or gauge wire under 3mm diameter) may not register consistently. Always complete a manual reconnaissance flight at a safe altitude before deploying subject tracking at low levels.
Ready for your own Mavic 4 Pro? Contact our team for expert consultation.